Hive report: Honey in the jar!

Harvest_20160702_135845

My first harvest! Two gallons of this wonderful sweet stuff. Finally extracted and in the jars. It was accomplished without too much mess in the kitchen,  without invasion of those little brown “sweet-eating” ants, and (thankfully) no particular interest from Frankie (the cat).

Hive report: harvest!

Big day! Yesterday, take off the super, and today–extraction!

I turned into a wuss yesterday and donned the bee jacket and gloves since I was going to pull a super of honey for harvest. I thought I might need to use the bee brush to get the girls off of the frames of honey. Even the calmest of girls can get a bit testy when you start pushing them around, but they were extremely calm and the escape board had worked very well.  (I hadn’t had the full jacket on since last July and I hope not to have it on again for a while.) The thermometer on my shaded back porch was reading 88 degrees Fahrenheit when I pulled that super of honey; I was dripping like a soaker hose. I did have to do a little brushing. The frames were almost all full and almost completely capped–felt like 35 to 40 pounds when I lifted it down from the hive. Much more when toting it from hive to kitchen even though the hives  are not far away.

20160628_101041My first extraction. I really appreciate Brushy Mountain Bee Farm’s video library, especially since I’ve not gone through an extraction with another beekeeper. I know part of the video is to sell stuff, but there’s good information on things to do and not to do.

Ò¿Ó

The kitchen was transformed into the honey room last night: plastic drop cloths  covering the table and the floor, the honey extractor, uncapping bucket, honey bottling bucket and the super of honey (but I did manage to leave a path to the espresso machine for morning coffee before I started the extraction this morning.

I’ve discovered one thing that I thought I didn’t need that I will have by the next extraction: a method of stabilizing the full frames over the bucket that I’m using to catch the cappings as I take them off the cells. It gets rather drippy and slippery as you’re lifting those nice little white caps off of the cells filled with honey. A full frame weighs about 4 or 5 pounds, and holding it up with one hand really exercises some muscles that I didn’t think about until almost the second frame! Why did I decide that I didn’t need the gadget that fits over the bucket and is designed specifically to rest and stabilize the frame?  Beats me now as I’m uncapping!  Hindsight is always so much better than foresight! Sigh!

20160628_103735Since the extractor is a tangential, hand-cranked one, it’s a rather long process and I’ve discovered that how you open the cells makes a huge difference in the amount of cranking you have to do. I opted for a capping scratcher, but it takes longer to spin out the honey with scratching as opposed to actually lifting off the cappings (or cutting with a knife)! After the first scratched frame, I resorted to lifting the caps off. But…next time I’ll try to arrange things so that I can use a knife. (I tried a bread knife, but the comb in these frames was uneven enough that it didn’t work well.

Seeing that first honey drain out of the extractor is a thrill.  Awesome. This was the first real taste I’ve had of the honey from my bees–my local honey. It is certainly different from the jars of supermarket honey that go as “wildflower” honey. True, what I’m extracting is “wildflower” honey, but it’s much more aromatic. I’m only straining–not filtering or heating at all to preserve as much of the character as I possibly can. My kitchen smells so good.

My kitchen smells so good.

I made less of a mess than I thought I might! I’m being un-ecological and not even trying to clean up that drop cloth. The honey  the bucket doesn’t look that impressive, but it is a five-gallon bottling bucket, so there is really a reasonable amount of honey there. Now to clean up the extractor.

The honey in the bucket doesn’t look that impressive, but it is a five-gallon bottling bucket, so there is a decent amount of honey there. I am anxious to see how many bottles/jars I have when I can bottle it after it has stood for a bit to let air bubbles go away (although I’m not entering it in any contests or the state fair–this year). I’m just happy to have it to share with friends.

Now to clean up the extractor and the other bits and pieces associated with this process. Most of it was easy to clean–a little soap and warm water.  I think the extractor is going to have to go outside for a good rinse with cold water from the hose! I’ve heard that I could let the bees come clean away the residual honey from the extractor;  but after a conversation with a Facebook friend, also a beekeeper, that might lead to bees stuck in the honey that’s still on the sides and bottom. Not good–don’t like stuck, dead bees!  I’m letting it sit overnight since honey is still draining down the sides to the bottom; I’ll see what has accumulated in the morning. For now, I feel like it was a good day’s work.

Ò¿Ó

I’m hoping to have a little cut-comb from the outside frames even though the ladies decided that would make a good brood chamber (along with the other three medium boxes). That will certainly be easier to process than doing extraction like this, but it is very taxing for the bees since they have to make new comb. With this extraction, they get the comb back to repair and reuse.

20160628_16300720160628_162937

Ò¿Ó

*


Hive report: 21 June 2016, and addendum

Wow! I’m NOT good at judging how fast my ladies work. I inspected both hives this afternoon–and made a trip to Bailey Bee Supply for more supers to put on the hives and some the basic paraphernalia need for my first honey extraction. I need only worry about the small stuff–the Durham County Beekeepers Association, our local bee club, has an extractor that I can rent–and I’ll pick that up on Sunday.

I’ve put the escape screen on the hive to let the bees out of the honey super, but not let them get back in. In a couple days, I’ll go back and remove the super with the honey and do the extraction.

Much to my chagrin, I discovered that I have brood and pollen stored in the super that was intended for cut-comb honey. The bees had virtually propolized the queen excluder closed so I, in my “newbee” wisdom, removed it.  Seems that ladies didn’t think that they had room enough to raise brood. So–now to figure out what to do about that. Looking at the number of frames that they have already drawn, I suspect that just became a brood box at least until later this fall. Next time around, I’ll know to keep the queen excluder on.

This morning (24 June 2016) I put a new honey super on Salvia–I’ve set my beekeeping software (Hive Tracks) to remind me to check in no more than a week to see what progress the bees have made on that new super. 20160624_112955

The lingo of the hive

20160528_163841_001It has finally soaked into my brain that I keep babbling on about “boxes”, “supers”, and frames–without much explanation so I’ll try to remedy that.  The hives (that is the woodenware or structure) is made up of a number of structures stacked vertically in layers. If you look closely, you’ll see that the hive on the left  (which is Rosemarinus–how else would a cook name hives?) has five “layers” sitting on a wooden base. Salvia (on the right) has only three layers right now (a new one added just today).  The hives that you see here are Langstroth (after the inventor)–a very commonly used vertical hive. The hive is made up of several parts. Let’s start from the bottom and work up.

Note: All the images of hive parts are from the Bailey Bee Supply website since my components are all in use.  The photographs of bees and in-use components are from my hives (bought from Bailey Bee Supply). Since many of the pictues seem to have disappeared, I’m adding a simple diagram that’s labeled.

Related image
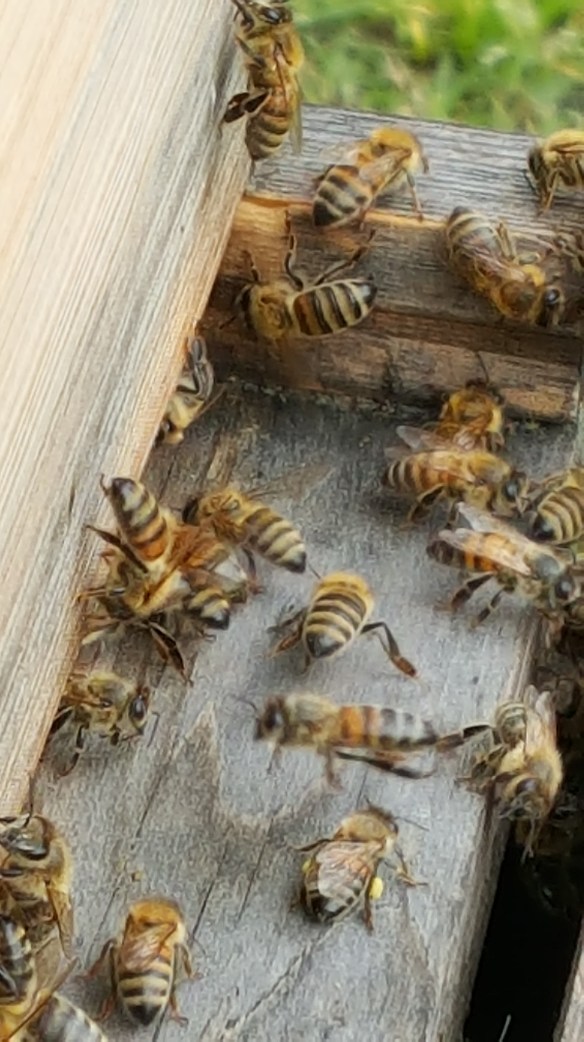
The wooden base with a sloped area (at the entrance) on the very bottom of the hive is a landing board to help the bees get into and out of the hive easily. It’s kind of a landing pad and place to taxi for takeoff.

Obviously, the hive needs a “floor” of some sort; on top of the landing board and frame we use a “bottom board”.  Clever terminology, huh?  In this hot climate for ventilation and to help control pests that like to hang around the hive, I use a screened bottom board–hardware cloth that is a small enough mesh that the bees cannot go through it. The white grid you see slides out so that the screen is open–it’s used to do maintenance things like mite counts when we need to assess for Varroa destructor infestation.

Now for the business parts of the hive. We build layers of “boxes” for various functions of the colony (that refers to the bees living in the hive). We add as many boxes as the colony needs to rear brood and to store honey so hives can be tall.  (The upper layer is just at shoulder height for me, filled with honey, so it weighs about 40 pounds.)


A box is just a wooden structure. We refer to them by different names depending on what the bees are using them for: brood boxes are where the queen lays eggs and the nurse bees rear new bees. Usually, the lower two or three boxes on the hive tower are used this way and we call those brood boxes or brood chambers. That huge open space is not very functional for bees to build tidy comb so we put in dividers: frames on which the bees build comb.


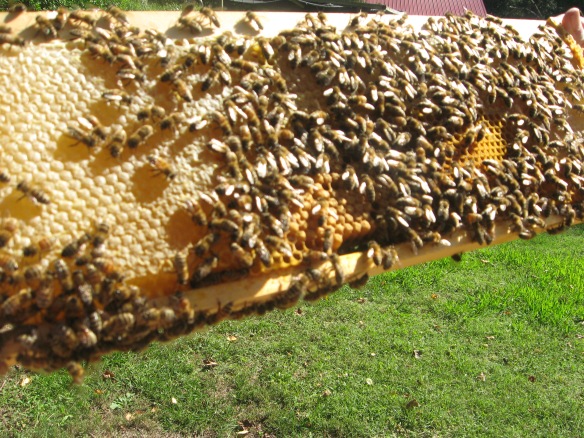
Here is a box filled with frames. Each frame is a wooden (or plastic) frame (like a picture frame without a picture in it). In order to help the bees be neat and tidy, we supply them with something to start building comb: a foundation–a base on which to build (draw) comb.  This can be a sheet of beeswax, or plastic (coated with beeswax). You see a frame with wax foundation tipped up at the back of the box.

Bees are constantly rearing new brood–in the summer when work is hard the lifespan of a bee is about six weeks. So the lowest three boxes on my hives are brood chambers. The frames there are filled with comb into which the queen deposits one egg is each cell. To keep the housework simple, honey and pollen needed for brood rearing are stored around the edges of each frame.

5 middle outer

Above is a frame that I’ve pulled out of the brood chamber for inspection. (It’s actually being held upside down as I’m rotating it to look at both sides–so the bottom of the frame actually appears at the top of the photograph.) The darker, golden brown comb that you see (and the area under the cluster of bees) is where the queen has laid eggs, which turn into larvae, and then into pupae. The bees here are nurse bees–they are feeding the larvae. This is a pretty typical brood frame.  An area at the bottom of the frame in an arc contains the brood. Around the ends and the upper edge of the frame is stored honey and pollen used to maintain the colony. The cells containing honey are covered with wax–“capped”.

6th middle outer

This frame is held right-way-up. You can see the brood area. Near the bottom center you see the golden brown cells that now have been covered with wax. These are what we beekeepers call “capped brood”–and contain maturing pupae–which will emerge from the cells to begin their working life. Again around the edge is capped honey. Now you have a general idea of the brood chambers. Hives will always have brood chambers. Now we come to another section of the hive–the honey storage part.

The term “super”–is the beekeeper way of saying that we have put boxes with frames above (over or superior to, thus “super”) over the brood chambers for the bees to use for honey storage–some of which we will take away for honey harvest.


bees on frame of honey


The frame above is from the “super”–the box over the brood chamber where there is only honey storage–no brood rearing. The wax here is lighter in color since it hasn’t been used for brood rearing–this is the good edible stuff that can be used for comb honey, or have the honey extracted (by centrifugation) and the comb (wax) returned to the bees to fill again.

Many of the cells here have already been covered with wax–sealed for storage after dehydration so that it won’t ferment. At the bottom center, you can see some open cells–uncapped cells–that still need to have water evaporated from the nectar for it to become honey. Now you know about supers as well as brood chambers.

inner cover

inner cover

Now our bee house (hive) needs a ceiling and a roof. The ceiling is the inner cover.  It helps to control heat in the hive, and allows us to use feeders if needed during the cooler weather or when not many thing are blooming or to get through the winter. (Yes–we do sometimes need to feed our bees.)

.


cropped-20160202_1347541.jpgFinally, we come to the “roof”–which in bee lingo is a “telescoping cover” or “outer cover”. We call it “telescoping” because it can slide forward or backward to allow ventilation through the hive in hot weather or to allow a top entrance for bees to enter and exit the hive. This is a basic, no frills, functional hive roof–what you see on my hives.

Ò¿Ó

As beekeepers we need to “inspect” the colony. That means that we look inside the hive to see if all is going well: the queen is laying eggs, to make sure that there is not some nasty disease in the colony, to see how much pollen and honey is stored.

inner cover

For an inspection we disassemble the hive into its parts and we pull at least some of the frames and look at both sides of them–to see if the honey is capped, and if the larvae look healthy, et cetera.

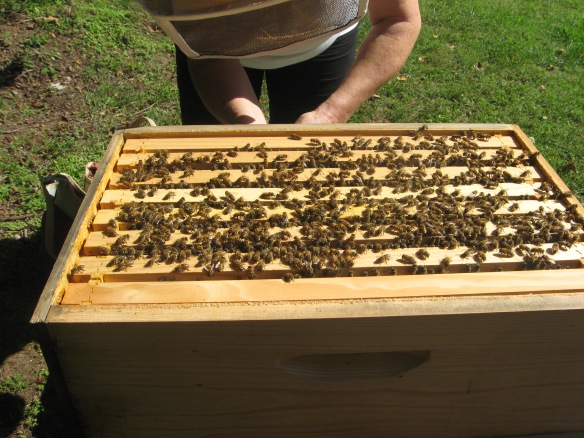
You start the inspection by removing the telescoping cover and the inner cover–after using some smoke to let the girls know that you are going to invade their home.

Here is my hive with the “roof” removed–and looking down on the “ceiling” or inner cover. You can see that you start encountering the welcoming committee right away. Once you remove the inner cover (below) you can see the frames in the boxes–and the girls going about their business. They’re going to be walking and flying around all the time you are inspecting the colony, but they don’t sting unless you injure them. (They die when they sting, so it’s a last resort for them.) But they are curious, and will explore so a veil is a necessity during an inspection.

lower body

Ò¿Ó

Now when you look at first photograph, I hope you can find the parts of the hive at bit better. Rosemarinus (on the left) has three brood chambers and two supers. If it’s a very productive season, I may need to add one or two more supers. One of the supers on Rosemarinus is for comb honey so can remove it when the girls have filled it and give them an empty one to go to work on.

Salvia (on the right) has only brood chambers right now. I’ll be keeping a close watch on it to see when they need to have a super put on so there’s plenty of place for them to stash the sweet stuff–some for them for the winter, and some for me.

Õ¿Ô

Hive report: 28 May 2016

I woke up to pleasant, sunny weather this morning–so I made a beeline (sorry, but I just had to put that in) for the hives.

I was feeling really pressured to inspect Salvia (the hive on the left) to see if I needed to add another honey “super”–another box with frames and foundation. My inspection was abbreviated as soon as I got the inner cover off and pulled out one of the side frames. Bees don’t really “like” to work the side frames in a box, so those are often empty or light. This one wasn’t it was a good three pounds with both sides drawn into comb and being filled with honey and pollen.Looking between the other 7 frames it was obvious that the girls had been very busy. I needed to make a trip to Bailey Bee Supply on a pretty urgent basis–this colony was started from the swarm from Rosemary. Since this was a long holiday weekend, and the weather is a bit uncertain with a tropical depression heading out way and I certainly didn’t want these girls to decide that the hive wasn’t big enough and decide to go live somewhere else. I closed the hive back up, leaving the feeder (which was 20160528_163841_001empty) off and moved on to check out Rosemary.

Rosemary (on the left) hive was inspected much more recently, so I just removed the top honey super on top–all 40 pounds of it–and pulled some of the frames in the super that is for comb honey. It looks as if the colony size is increasing now that the queen is laying. The bees have started drawing comb and storing honey on the center frames of that box now the queen excluder (which was almost entirely closed off with propolis) has been removed and the colony is growing rapidly. I closed that hive quickly so that I could make it to the bee store before they closed at 2 p.m.

After my dash to Hillsborough, I came back and gave the girls in Salvia some more room to stash honey on nice tidy frames instead of building extra comb on the base of the feeder–I think they were definitely feeling crowded.

Normally I’d give them more room when they had used 5 or 6 of the 8 frames in the box, but these girls had been so industrious that they were already close to filling all 8 of the frames. Looking in the hive today made me realize how fast they can fill a super with honey. I was a little late adding the super–I’m just glad I wasn’t too late.

Real honey!

We are seeing more and more news about bees and honey–honey  adulterated with substances like high-fructose corn syrup. This review of what you might really be getting in that jar from the supermarket is excellent–with good supplemental links. Please read this so you know what might (or might not) be in that jar labelled honey.

Did your honey come from bees?  from YayYay’s Kitchen is a great article. After reading this, I hope you’ll find a local beekeeper or a farmers’ market and buy your honey there.

If you want to be really sure that your honey hasn’t been processed in any way, look for honey in the comb (cut comb or chunk honey)–still just as the bees packaged it. If you want honey extracted from the comb your best bet is still a local beekeeper who can tell you about how the honey was processed during and after extraction from the comb.

bees on frame of honey

This is a photograph of one of the frames from my Rosemary hive–lots of honey stored here. At the right are cells of honey that are capped. This means that the bees have evaporated moisture from the nectar to a level where fermentation will not take place, then sealed the cells. At the bottom center of the photograph,  you can see cells that are open and being filled with nectar.  These have not had enough moisture removed for capping.

When you buy comb honey the cells will be closed or covered with beeswax (capped). You know that honey is just as the bees made it.

Let’s hear it for the bees and the beekeepers!


Hive report: 15 May 2016

Happiness! My large colony, Rosemarinus, that produced a swarm on 24 March 2016 is now queenright.

Finally, a day with conditions that didn’t make opening the hive to do a major inspection of the colony traumatic for either the ladies of the hive or for me! It was just a bit cooler than I would have liked–the temperature 70 degrees Fahrenheit, with a bit of wind–about 5 mph. The local weather report was cooler than that but the hive was in a sunny location and I decided that I really needed to know if the colony had successfully reared a queen. So I opened the hive today and took a good look inside.

20160116_pupae and burr comb_134800
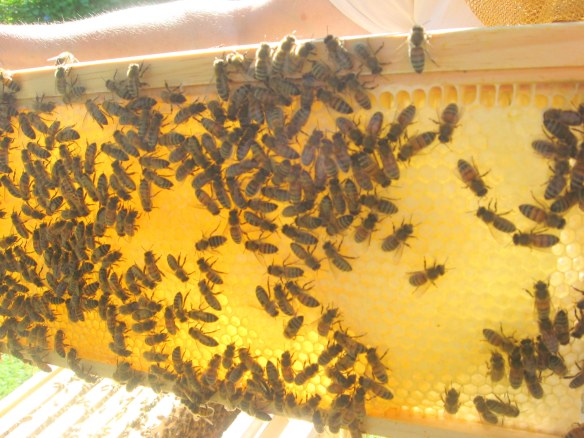
Although I didn’t lay eyes on the queen, it was obvious that she was in there somewhere doing her thing. There was lots of brood in an excellent pattern. There was brood in all stages, but what seemed alike an incredible amount of capped brood.

Though the population was down from the last time I opened the hive, I suppose that is to be expected after the queenless period.  Even so, it seems to be a good strong hive with lots of bees. I’m not experienced enough to tell if the population decrease it what would be expected under those circumstances or if there was a small secondary swarm. What I do know is that the colony is now queenright.

The girls weren’t making much headway on the comb honey super that I put on the hive yet. I moved it down on the hive and placed the super full of capped honey on to. That was an experience–hefting that full super up to shoulder height! It makes me think more seriously that the next hive will be a horizontal Langstroth with the kind of set up that allows honey supers to be put on top. I now know just how heavy an 8-frame honey-fill super really is. Not complaining, just observing.

I’ve now had my third beesting  (note only my third) since I started working with the bees at the end of July last year. I’m still not wearing gloves to work the hive. Every sting that I’ve had has been because I’ve managed to put my finger down on a bee. I still think I’ve lucked out and gotten some good genetics in this colony again.

Yes, I’m happy! Rosemarinus has a queen–even though I haven’t actually seen her, and she is not marked. That’s for next inspection.


Hive Report: 13 April 2016

Though not as warm as I’d wished, and much windier than I liked, I thought it was hive inspection time again. Amidst errands and indexing work, I opened both hives on the 13th.

quad feeder base on inner coverSalvia was quick and easy. The queen was in there doing her thing and easily found since she was marked when she arrived here last summer. I found brood in all stages as well as honey and pollen. Looking good but since this is a small colony I’m feeding them. I removed the Miller hive top feeder which I find difficult to handle if there is any syrup still in it (and it seems that there inevitably is). I replaced that with the hive top feeder that I got from Brijean Acres Apiary after a Facebook friend told me how well she like that type of feeder. It sits on the inner cover and holds four quad feeder with jars in placesmall-mouth mason jars. Since my hives are just outside my front door, I can check feed often, so this feeder works well for me. I’m feeding that colony 1:1 sugar syrup with Honey-B-Healthy. (Though they are doing some foraging they are still taking the syrup. When they quit taking it, I’ll quit feeding.)

ô¿ô

Rosemarinus was quite a project–three medium hive bodies, two medium honey supers, and then the one honey super for cut comb honey. This inspection of the hive was to check the queen cells and look for a new queen.

That hive still seems to have an incredible number of bees even after that swarm which was small. It was so windy with gusts that made it difficult to use the smoker. Just getting the girls to move so that I could pick up frames by the ends without smooshing bees was difficult. I was wishing for frame grips when I had to resort to picking up some of the frames in the middle.

I didn’t get a full inspection of the two very heavy honey supers but on earlier inspections, there was no brood in them. I did inspect the three medium hive bodies frame by frame. The swarm happened on 24 March. When I looked in the hive on 31 March, there were some queen cells and some brood. On this inspection, I found no eggs, larvae or capped brood but there were open queen cells. Some looked as if they had been opened from the side. I hope that is a sign that there is a queen lurking in the hive, and I just didn’t have a good enough eye to find her. I saw one closed queen cell that I left in place since I didn’t find a queen.

I’m getting a bit antsy since that same day I saw a group of bees (about the size of the original swarm) flying around quite a distance from the hive. They eventually went back to the hive, and I haven’t had bees collected on the outside of the hive as I did with the original swarm. I saw a good example of a virgin queen at our last DCBA meeting so I’m sure that I might well not have seen a queen even if she were in the hive.  Once I do find her, she will get mark so that it’s easier to find her amongst all the other bees.

Now I have to wait. Not patiently, but wait to see if the colony is going produce their own queen or do I need to purchase one from a supplier. I’m keeping my fingers crossed that the colony will (maybe even already has) provide a queen–these seem to be very gentle, productive girls. I like that!

IMG_8453

Hive check: 01 April 2016

This was my first inspection, though a very quick one, of the new colony in Salvia. The bees are drawing comb on wax and on plastic foundation. Queen (Salem) seen on a lateral frame. Conditions really not optimal for a detailed inspection–as the sunshine quickly disappeared as clouds rolled in and it got much windier. The light wasn’t good for visualizing eggs in the cells, but I THINK I did see some in cells near the queen. I didn’t inspect all the frames with capped brood.

Conditions were really not optimal for a detailed inspection–as the sunshine quickly disappeared as clouds rolled in and it got much windier. (With gusts you could see the bees clinging onto the comb–not a good time to have the queen out in the open.) The light wasn’t good for visualizing eggs in the cells, but I THINK I did see some in cells near the queen. I didn’t inspect all the frames with capped brood.

I now know that the split is on its way!

Love my Hive Tracks Beekeeping software!

Hive report: 31 March 2016


RG Queen bee

Queen Salem

First, I’ve officially named my hives now–after herbs. Rosemarinus (#1) and Salvia (#2–the new, split). Now to figure out a consistent way to designate the queens and track the lineage, since I’m allowing Rosemarinus to “make” its new queen. I think I will name the queens after cultivars/varieties of the herbs. Maybe since my first queen was marked with blue (year ending in 5), I think she is Salem. It’s her blue dot that has kept me from losing her twice! The new queen, from the Rosemarinus hive, will be marked with white (year 6) so she’s could  be christened Irene (a white-flowered cultivar of Rosemarinus)–perhaps!  I have to work out something that will be logical and consistent. I can see a problem with that right off–Queen Irene, descended from hive Rosemarinus, but living in hive Salvia?!–perhaps I need to work on this some more. Hives will definitely be named after herbs though.


The performance and temperament of that hive as been so exceptional that I want to keep the genetics as much as possible. Thus, the hive has only capped brood, and queen cells. There have been about half a dozen queen cells made between the time that the first one was found open and this inspection today.

Õ¿Õ

It was blustery, partly cloudy, but warm today so after looking at the weather forecast–rain possible for the next several days–I decided I HAD to inspect Rosemarinus (at least) today. That was quite a job since there are three medium brood boxes, one honey super on regular wired wax frames, and one honey super with thin wax foundation (above a queen excluder) for cut comb honey. All these boxes have bees and all except the cut comb super and being drawn, including the very outside frames.  The girls have been very busy.

I put some wax-coated plastic foundation in that hive and the bees are drawing it out quickly. I’m happy to see that as I think it will make less work on equipment for the beekeeper, with more time to attend to the bees and the cut comb honey production.

I opened Rosemarinus hive to start the colony inspection at 13:00 EDT with less than optimal condition: partly cloudy, steady wind at about 7 mph, with gusts up to 10 or 12 mph. Since this hive is heavily populated despite the swarm (that went into Salvia)  I needed the smoker once I had taken off the cut comb honey super–really don’t want my cut comb honey to be reminiscent of BBQ! It was so windy that it was difficult to use the smoker effectively so the girls did a lot more flying about than usual–I think they get cranky with me taking the roof off their home when it’s windy, but none registered displeasure by stinging me. (Another reason to maintain the genetics that I have going in this hive.)

I finished a pretty thorough inspection at 14:05 EDT with lots of bees buzzing around outside the hive and clustered on the sides of the hive. Since that hive has been without a laying queen for at least seven days it wasn’t surprising that I saw only capped brood–and queen cells.

When I was about two-thirds through the inspection it was getting windier and completely overcast;  more and more bees were flying around me and around the hive. By the time I reached the lower brood box, agitation was setting in so I didn’t inspect each frame individually–I moved them to one side so I could look down between them–lots of bees there as well.  I could see some capped drone brood protruding, so I know that there is brood in all three boxes. The bottom board wasn’t littered with dead bees either.

Since I had inspected the honey super containing wired wax foundation a week ago, I let that one slip in favor of a more in-depth examination of the two brood boxes, and the one where I found the first queen cell.  Unfortunately, the weather didn’t let me do the complete examination of my lower brood box–I just know that there is some brood there, and  a lot of bees.

I’m happy to see multiple queen cells–I now know that the first one has not emerged yet. It was a little tense thinking of only one possible queen, just in case anything went wrong. Because of the weather, I didn’t even attempt a sugar roll for mites today, which leaves me just a bit anxious about levels; I’m going to try the sticky board again to see if I can get at least some idea of mite population. I was planning to treat (if needed) with MiteAway Quick Strips, aka MAQS (formic acid), but I’m hesitant to do that with the developing queens in the hive–at least until the new queen is established.

If the weather is suitable I plan to open Salvia and see how Salem is settling in  I hope that I’ll need to add a second brood box to that hive shortly.

Anticipation!


20160331_115659

Rosemarinus, 31 March 2016