Garlic mashed potatoes

My assigned dish for the Thanksgiving dinner that I always have with friends is garlic mashed potatoes…I love them, but don’t make mashed potatoes for one.  One of the reasons is that I want my mashed potatoes to be unctuous, with lots of butter and (at least) half-and-half–not something I should be adding to my diet often.

This year, I made my Thanksgiving garlic mashed potatoes as described inCook’s Country recipe for garlic mashed potatoes–it’s a one-pot method that produced a lovely result–with less effort that the way I had done them.  It’s always been my contention that I don’t want to cook potatoes for mashing in the jackets–I hate having to peel them while still hot, and I certainly don’t want to boil peeled potatoes in water–I want all that lovely starch to be available to absorb cream and butter–so I’ve always steamed them and then let them dry out just a bit before I start mashing.

This recipe took a different approach:  the potatoes were cooked with the minced garlic (after it was sautéed in butter) and then cooked in the half-and-half with a bit of water added.  Once tender the potatoes were mashed right in the pot, adding some more butter, and half-and-half.

I’ve looked at this recipe and wondering if this approach could be adapted to making mashed potatoes (decent ones) for one, or maybe two.  It would certainly be faster than baking a potato and then making mashed potatoes, since the potatoes are cut into 1/2-inch cubes before cooking and you do the mashing right in the same pot that you cooked them in–less clean-up to do, as well.

Adapting this recipe for one seemingly would involve just a ratio adjustment–but that will take a test run to see if it is so simple.  Since the original recipe called for four pounds of potatoes (designed to serve about 6 or so), it might take some tinkering, but sometimes mashed potatoes (like risotto) are necessary even when doing single-serving cooking.

Turnip greens…

Loose mustard greens

While having leisurely Sunday morning coffee I was browsing through the Huffington Post and discovered a presentation on rediscovering mustard greens (though I didn’t realize that they were lost or misplaced). If mustard greens need rediscovery, then perhaps turnip greens need rediscovery (or just discovery) too. One of my favorite things to do with heartier greens (those that need longer cooking, unlike spinach) like collards, mustard, kale, dandelion, or chard is to braise them with sausages for a one-pot meal that is easy to make in any quantity–and reheats and freezes well.

Just recently I was the happy recipient of a LOT of turnip greens from a gardener who likes the bottoms–the turnips and not the green tops. Some of these were older–so a bit spicier, with some of the “horseradish” tang that you find in mustard greens as well.

Even though it was warm weather, I had just started an intense indexing project and wanted some easy food–braised greens with sausage.  No need for a recipe and certainly not labor-intensive or needing a lot of attention while it cooked. (I thought about using the pressure cooker, or the slow cooker but just did this on the stove-top this time)

hot italian sausage IMG_6092I started by dicing and sautéing a large onion, then added a mix of sweet and hot Italian sausage, removed from the casings, to brown lightly.  Of course it needed garlic–about half a dozen large cloves, minced. (The garlic mellows a lot during cooking.)  Since the greens had their own “heat” and I had used hot Italian sausage, I didn’t add the hot red pepper flakes that I would have used with other sausages, or other greens–e.g. kale or collards.

Once the garlic had sautéed enough to become aromatic, I added the washed and cut up greens (still wet from washing) and a can of diced tomatoes. In a tightly lidded pot, I left this over low heat until the greens were almost tender–about 45 minutes. (Since these were older turnip greens, I did remove the stems before cooking.)

In went one can (rinsed) of pinto beans (not on the low-carb diet, but…) and continued to cook about 30 minutes more to let the beans pick up some of the flavor of the greens and the sausage. Home-cooked dried beans would have been better, but since I didn’t have any of those in the freezer, and hadn’t planned ahead–canned ones had to do for now.

And there you have it, a quick supper, and a couple of servings for the freezer for several more quick, comforting meals.  Since the greens were spicy, the sweet Italian sausage added a nice counterpoint. I’m glad to have some tucked away in the freezer since I suspect that will be the last of the turnip greens for the summer–as the weather gets hotter the greens get a bit more assertive. If I’m lucky and there are more, I’ll probably do this again, but omit the hot Italian sausage. Or think about doing this with lamb sausage…so many possibilities, and so easy–and reasonably healthy as well.

All you need to add is a glass of a nice sassy, robust red wine, and maybe some good crusty bread (if you’re not on a low-card diet). A son goût!

Treasure from the “manager’s special” grocery cart!

Sometimes I stop at the front of the grocery store and rummage through that end-of-season, after-holiday stuff: the green and red candied cherries, and the like.  I seldom find anything that I want to bring home with me so I’m not always consistent about checking it out.  I have to thank an observant friend and neighbor for a “find” in that cart recently: truffle oil (from Tuber melanosporum, the Perigord black truffle)!  She thought I might like to know about it–and a phone call sent me scurrying off to the grocery store to check it out.

image from Wikipedia

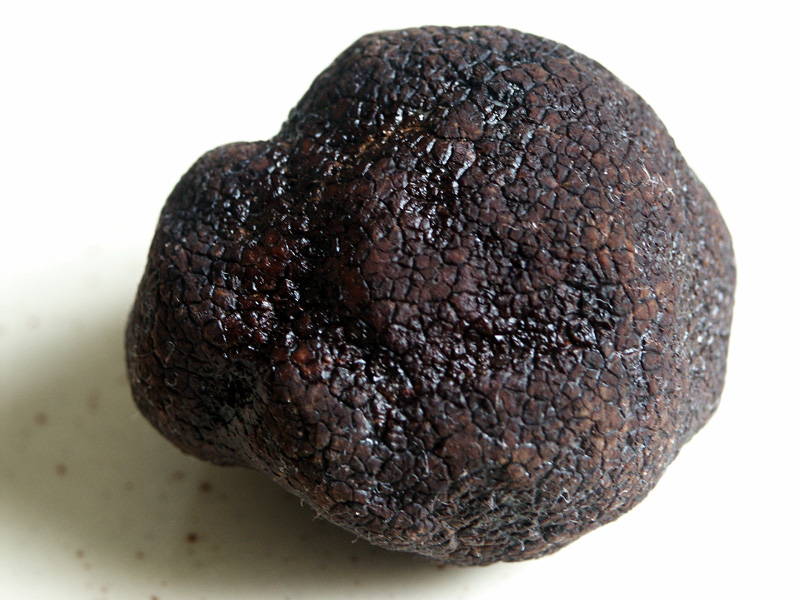
black Perigord truffle

I was pleasantly surprised to find two  8.54-ounce cans of La Tourangelle black truffle oil languishing amongst the mounds of candied cherries, candied pineapple, and other post-Christmas goodies.

Even at the price marked before it ended up in the manager’s special cart,  I would have tried it–but at half that, it was a true no-brainer–$4 and a little change.  I came home with two cans–one to share with a fellow foodie so that we can be creative with it. So did I bring home treasure or not?

I’ve had the good fortune, in one of my previous careers, to have had experience with freshly harvested black truffles from Garland Truffles here in North Carolina, so I know that they should smell like. I was trying not to expect too much from my little bargain–a bit of the expect-the-worst pessimism, so that I might be pleasantly surprised.

It’s hard to describe the aroma of fresh black truffles–but I’ve experienced it, so I was almost expecting to be disappointed when I opened that can of truffle oil. I guess it was a bit of you-get-what-you-pay-for, and I sure didn’t pay much for this. I was hoping for that rather ethereal, woodsy, moist, warm aroma, that makes you say “Wow, what is that?”   It’s just unforgettable once you’ve experienced it.

When I popped the seal and smelled that truffle oil,  I was even more pleased with this find–the aroma was all it should have been–woodsy, earthy, moist (not damp, moldy, or musty though), and warm,  in a way that set me right out in the woods in the sunshine.

A little searching on the Internet I found the La TourangelI website--with an amazing array of artisan flavored oils.  After checking prices on the web, I realized that I really had an amazing bargain.  I’m not sure what the original price was in the grocery store, but I spent $4 and some change for the can, that had another price of a bit more than $8.  The cheapest price I found online was at least double that latter price, and I’d say that’s not overpriced given the per-pound price of Tuber melanosporum!

I love truffles, but they aren’t usually on my budget, so this is fantastic to have that much truffle oil–truly a rare treat.  I’m still thinking of things to do with it–incredible fun for a foodie!

What have I done so far?  Well, one of my favorite combinations is truffles and potatoes.  My favorite decadent treat?  Take one properly baked russet potato (no foil anywhere near it and not microwaved either), and add some truffle butter.  Okay, I didn’t have truffle butter, but this oil had a strong enough flavor that mixed with some softened butter, I came very close to the truffle butter than I had made  when I had access to fresh truffles.  Then, add some earthy, yeasty Champagne, and it is awesome.

Then, I’ve drizzled a bit over a lovely steak–yum!  And added a few drops to my omelette–and (as claimed by La Touranglle) the flavor stood up well to the heat necessary to cook  the omelette, though I’d certainly not expose the truffle oil to high heat.

What next?  Well, I’m contemplating possibilities for combining this with another of my favorite foods, oysters.  I’ve looked at recipes for truffled oyster stew, and found some possibilities…but who knows what will be next…maybe a bit added to a grilled cheese sandwich (preferable made with raclette).

It’s time for improvisation in the kitchen.  A son goût! 

Cauliflower-black olive gratin (for one)

I started with the recipe from The New York Times that I had mentioned in an earlier post–and adapted it for single-serving cooking.

cauliflower, black-olives, garlic, shallot

just a few ingredients

My first “adaptation” was NOT to buy a whole head of cauliflower–I like it but I usually waste some of it, so I purchased 250 grams from the salad bar at my local Harris Teeter store already cut.  This was about 1/4 of what the original recipe called for (900 to 1000 grams).

My second adaptation was to use the rice cooker to blanch the cauliflower!  Put water in, add salt, close the lid and set the “rice cooker” mode.  In just a few minutes when I opened the lid I had boiling water.  I added the cauliflower, close the lid and blanched for about 5 minutes, then proceeded with the recipe–faster than a pan of water on the stove top!

My third adaptation is one I use often in cooking for one–I used shallot instead of onion since I don’t like bits and pieces of cut onion loitering in the fridge–so one medium to large shallot, prepped as for the onion in the above recipe.

gratin dish with cauliflower

oven ready

That recipe called for 16 olives–well four olives just didn’t look like enough, so I used six. Garlic–well, I used two very small cloves. The rest of the ingredients were “measured” by eye: parsley, the Parmigiano-Reggiano were whatever looked like enough for the amount of cauliflower–maybe my adaptation is a bit cheesier than the original, but  that’s okay with me!

The results were fantastic, maybe even awesome! (Please note past tense–well, there was a tiny bit left, but that’s probably because of the rather large cod fillet–a leftover as I define leftovers–re-warmed in sugo alla puttanesca.)   This was one of the best things that I’ve ever done with cauliflower. It’s a keeper with lots of room to improvise: some red pepper flakes added to the shallot-olive mixture, or maybe some roasted red peppers.

browned gratin of cauliflower

ready to eat

I think that I might step down to 150 grams of cauliflower next time, and bake it in a slightly deeper dish–but it will definitely be made again. I do need to add more garlic, though. I can’t believe how easy it was.  This is my kind of recipe–not at all fussy and open to modification to fit my mood, the weather, and what else is served.

<><o><>

The cod fillet was a “leftover”–meaning planned.  The method of the “rerun” was unplanned.  After several days of intensive course preparation for online courses, I suffered a serious case of cabin fever.  On impulse, I called a friend, and we went out to dinner at one of my favorite causal places, Meelo’s Ristorante, here in Durham, since I had a serious craving for Andre Chabaneix’s spagetti alla puttanesca.  There was a bit of the puttanesca sauce left in the bottom of my plate, so I brought it home with me.  I used it to gently re-warm the cod fillet for supper this evening–now I’m going to have to see if I can match his sauce so that I don’t have to go out every time I want puttanesca sauce.

cod with puttanesca sauce

cod with puttanesca sauce

A new take on a Southern tradition…

Produce display of bunched collard greens

collard greens

I’m not a native to the “real” South, so I was intrigued to learn about the custom of having collard greens and black-eyed peas as a mandatory part of New Year’s day dinner.  I like greens–so not big thing about the collard greens.  I like pulses, legumes, and all those things too.  Again, no big deal.  Unfortunately, I may be a less finicky eater than some of my friends and acquaintances.

On several occasions I’ve been the delegated to prepare those dishes for New Year’s day meals.  So–dinner for eight or so, I prepare collard greens and black-eyed peas in a traditional Southern style–well, talk about leftovers–everyone had the mandatory dishes–about a teaspoon of each!   Next year, I lucked out again–make collards and black-eyed peas. I made a much smaller quantity of each, but still had mega-leftovers.  Enough of that!

Next time I was delegated to bring collard greens and black-eyed peas to a New Year’s Day gathering, I decided that something had to be done to make those palatable to the kind of guests at the meal–true we’re all foodies, but some of us more than others.  I decided that the problem was not collards and black-eyed peas per se, but rather that they just did not fit with lovely roast duck with a nice fruit sauce.  I decided that I needed to present them differently.

Personally, I’d happily make a one-dish casserole of the collard greens, some sausages, and the black-eyed peas–a variation on one of my favorite recipes from Jacques Pepin’s The Short-cut Cook That still did not fit with New Year’s Day festivities.

My next though was that all these people (in fact, most people  I know) really like risotto.  After perusing a number of recipes, it seemed that as long as you could add most anything to basic risotto, as long as you did the appropriate pre-cooking.

I decided that it was time for collard greens and black-eyed peas to make a début as risotto ingredients.  Thankfully, the frozen vegetable case at my local supermarket came to the rescue: frozen collard greens (chopped), and frozen black-eye peas!  Happiness.

I started the basic risotto recipe with onions, white wine, olive oil, and sautéed  the rice.  I used home-made chicken stock for the liquid.  Frozen collard greens are already blanched, chopped, so all I did was to thaw them,  give them a bit more in the way of a rough chop, and since they are rather “tough” greens, steam-sautéed  them (without adding any more liquid) until close to being done.

The black-eyed peas seemed a bit more problematic since I knew that those can turn to mush easily as they’re fragile; I cooked those separately until almost done (according to the directions on the package).

When the risotto was close to being done, I added the collard greens and the black -eyed peas, and then finished the risotto with the Parmigano-Reggiano as usual.

Taking into account my earlier “luck” with collards and black-eyed peas, I made less than I though eight or so people would eat.  Wrong again–needed more–these foodies wanted seconds!

A son goût!  

Panzanella (Bread Salad)

lots of tomatoes laid out on table

tomatoes, tomatoes…

Tomatoes, tomatoes and more tomatoes! So many ways to eat tomatoes…caprese salad, good old-fashioned tomato sandwiches–good white bread, mayonnaise, and juicy tomatoes; a sandwich that has to be eaten over the kitchen sink.   Then there is the BLT!  All good, but what else can you do with the summer abundance of tomatoes? Obviously  you can freeze some, or make sauce to freeze for winter use,  but one of my summer favorites is panzanella, or bread salad.  Since stale bread is a fact of life, even when you bake your own pretty much “on demand”, here is one of my favorite ways to use it up and to enjoy summer tomatoes.

This is a summary and adaptation of  my “go-to” recipe from Marcella Hazan’s Essentials of Classic Italian Cooking (pp. 554-555):

Ingredients

  • 1/2 garlic clove, peeled
  • 2-3 flat anchovy fillets, chopped fine
  • 1 tablespoon capers, soaked and rinsed
  • 1/4 yellow bell pepper, ribs and seeds removed
  • 1/4 cup extra-virgin olive oil
  • 1 tablespoon good red wine vinegar
  • 2 cups firm bread (cut into 1/2-inch squared), trimmed of crust and toasted
  • 3 fresh, ripe, firm tomatoes
  • 1 cup cucumber cut into 1/4-inch dice
  • 1/2 medium sweet onion, diced
  • fresh-ground black pepper and salt to taste

Preparation

  • Mash the garlic, anchovies, and capers to a paste.
  • Toss  the pepper, garlic, anchovy, olive oil, and vinegar together in a bowl.
  • Put the toasted bread (and any crumbs) in a small bowl.
  • Purée one tomato in food mill; add to bread an allow it to steep for 15 minutes or longer.
  • Skin and seed the other 2 tomatoes and cut into 1/2-inch pieces (picking out some of the seeds if there are too many).
  • Add the cut tomatoes and the bread squares to the bowl with pepper, garlic, anchovy, oil and vinegar mix, and  add the cucumber and the onion; toss thoroughly.

While the recipe calls for peeling the tomatoes, I don’t usually do this unless the skins are very tough–I’ve no objection to the extra fiber, and some objection to the extra work that peeling them takes.  I don’t pick out seeds either–I think that the “jelly” surrounding the seeds adds extra flavor and an acidity that is lost by removing them–however, if you want a more refined version, by all means peel and remove seeds. (If you keep the “jelly” and seeds, it increases the tartness of the tomatoes, so you might want to decrease the wine vinegar–just taste it and season accordingly.) You can add fresh herbs of your choice–basil, marjoram, oregano, Syrian oregano (zaatar)–whatever strikes your fancy!

If this cookbook is not in your library, there is also a recipe for a simpler version of panzanella at Epicurious.com.

If you’d like to make this a meal in itself, add some good quality canned tuna or your homemade tuna confit to it. Cucumbers and onions are certainly optional.  Some fresh mozzarella would work here too.

The basic recipe above makes four to six servings, but it’s very easy to cut this down to make a single-serving quantity–just eyeball it!

I decided that this had potential for a bacon, lettuce and tomato salad so I did some modification: omitted the anchovies, capers, and the pepper.  I prepared the bread and the tomatoes as for the panzanella, and substituted balsamic (or rice wine) vinegar.  I kept the cucumber for it’s crunch and freshness and the sweet onion, even though they are not part of the BLT.  I added crumbled crisp bacon, and had this over romaine lettuce.

Since I did this improvisation  (it just wasn’t something that I needed a recipe for), I’ve googled “BLT salad” and found lots of variations on that theme, especially with the dressing.  Since I’m one who does like mayonnaise with my BLT, I’ve looked for dressings using it, but haven’t found anything I like better than the basic oil and vinegar, though I may be adventurous and try a creamy dressing with mayonnaise, thinned with buttermilk in the future.

A son goût!  

Pumpernickel with seeds

sunrising through trees

morning through the kitchen window

I’m sitting here this evening, writing and waiting for the first loaves of the pumpernickel from the Healthy Bread in Five Minutes a Day (p. 115) to come out of the oven.  I’ve peeked in and they look good and smell wonderful!

(Why does it seem that it takes so much longer for bread to bake once it smells so good that your practically drooling on the keyboard? I just know that one of these loaves is not going to get to cool as it should even though I know cutting it immediately will not help–that’s one of the reasons I like baking two smaller loaves–I can treat myself, and still have good bread for sandwiches.)

Waiting, and not very patiently….

Just because of the way that I use bread, I’ve baked these in the perforated Italian bread pan.  The crust is probably not quite what it would be directly on the baking stone, but it quite good and I have the longer, slightly skinnier loaf, and it’s easier if I want to bake a second loaf to share with friends.

This healthy bread has whole wheat flour, rye flour, and flaxseed meal in it…and I did put in the caraway seeds this time too.  I did tamper with the recipe that was given in Healthy Bread in Five Minutes a Day.  I really do make an effort NOT to play with the recipe until after I’ve made it as given once, but I did not make it this time.

Since I had white whole wheat flour which gives a milder flavor instead of regular whole wheat, my dough wasn’t very dark, and it just lacked something in the kind of “bitter” smell that I’ve liked about that last batch of pumpernickel.  The “missing ingredient was the unsweetened cocoa powder, so I got carried away and put in cocoa powder.

One loaf of pumpernickel bread on cutting board with butter-bellIt’s out of the oven now, and cooled just enough so I can ravage one of the loaves–I’m cutting the one that didn’t rise quite as well, but it’s a keeper.  As you would expect with more whole grain flour, it’s more dense than the first batch, but a good crumb–which I’m sure would have been better had I not cut it so soon.  The flavor is great–the cocoa powder did the trick to take up for the white whole wheat flour, and I think that the flaxseed meal is really undetectable.  The amount of caraway seed called for in this recipe was only 2 tablespoon for four loaves–so it stays as a kind of “dark” background flavor.

This will get made again–with the modifications.  I think that I can work with this (without caraway) to try to get the Russian black bread recipe (the Smitten Kitchen) adapted for the no-knead technique. (It’s not just that it’s no-knead–I have a KitchenAid® mixer.  The real attraction is that I can have this dough in the fridge for a long time–10 to 14 days–and have freshly baked bread quickly and often, too.)

I’m now enjoying my warm (actually, hot) freshly baked bread with some unsalted butter and a light sprinkle of sea salt since the butter has no salt.  I do have some radishes in the fridge to have a radish sandwich tomorrow after the bread has really cooled!  That will be time to break out the bubbly!

one whole loaf and one cut loaf with slice of bread with butter.

…A son goût!  

Another use for Ball/Mason jars…..

This was just on my Facebook news feed from Savory Simple.  I have never found a travel mug that cleaned up easily…and they are not cheap!  Since I use wide-mouth canning jars for so much of my storage, I have them around in various sizes.   Definitely have to have one of these gadgets!

Tuna salad

Not that there’s anything wrong with traditional American tuna salad, but there are lots of other things to do with  tuna.  I like tuna, but I don’t want “tuna salad” in the traditional sense every time, so I’ve come up with lots of variations.  Some of the best are made with the “leftovers” from grilling a lovely big tuna steak or with my homemade tuna confit.

My “salad” might have onion and celery (if present in the refrigerator) but it’s certainly not a requirement; no mayonnaise either (though I do like the stuff).   Home from work, not going back out to the grocery store; it’s warm enough that I don’t want anything hot for lunch.  What have I got to work with from the pantry and the refrigerator?

If you think about the basic American tuna salad, it has very few ingredients:  usually mayonnaise, celery, onions, and maybe hard-boiled egg, or sometimes pickle relish.

Personally I find the usual supermarket canned tuna to be unappetizing–dry and crumbly if it’s water-packed white albacore, sometimes mushy  and fishy lacking in any real texture,  so I understand why it’s often hidden in the mayonnaise, but there are now  reasonably priced alternatives available.  If I don’t have homemade confit, I’ll be using a single-cooked canned tuna that more nearly approximates the quality of European canned tuna.

Starting with good quality  tuna, unless you want to go all the way and make salad à la niçoise you really don’t need many ingredients.  You don’t really want to overwhelm the tuna (since we are using good tuna here) so the components you need are:

  • some contrasting texture and flavor ingredients
  • just a bit of oil
  • a little acid to brighten it up.
  • fresh-ground black pepper
  • some fresh herbs for extra flavor

Starting with a six-ounce can of tuna, here are some possible things to do:

  • For something light, refreshing  and crunchy for a sweltering day, I like to use diced cucumber, scallions, red onion or sweet onion like Vidalia (depending on what’s in the fridge), fresh-ground black pepper, salt (if the tuna has no added salt), about a teaspoon of very fruity extra-virgin olive oil, a squeeze of lemon juice, and some finely chopped spearmint.
  • For something really quick, I’ve  added some  fresh onion, sweet bell pepper,  diced chile peppers for texture and some salsa  from a jar.  Chipotle salsa can give you a warmer, smoky taste.
  • If you want a heartier salad, add to your tuna some drained, rinsed white beans (great northern or cannellini are my favorites), tomatoes, chopped onion, green or black olives, some extra-virgin olive oil or aïoli (easy to make a quick version if you have decent mayonnaise in the fridge) and some fresh oregano.
  • If you have some pesto in the fridge, try chopped onion (almost always use this), diced tomato, capers, or olives. If there’s pasta around, that can be added too.
  • I usually have a jar of a fruit salsa in the fridge as well and that makes a good start.  Add sweet onion like Vidalia or Walla Walla, more fruit such as peaches or mango, some ripe bell peppers.
  • Black beans, diced tomatoes, onions, chile pepper, ripe bell pepper (I’m just not fond of green bell peppers so I don’t use them), celery, and even some corn and a vinaigrette with a light touch of chilli powder added.
  • For an oriental take on the tuna salad,  a bit of sesame oil (the kind from roasted sesame seeds) with some ginger, green onions, a little garlic if you like, with cucumbers, celery.
  • That extra serving of roasted vegetables–even potatoes–with cherry tomatoes, and a splash of vinaigrette, maybe some fresh thyme.

Obviously, a many of these suggestions would work equally well with chicken if you have that instead, or don’t like tuna.  It’s easy to improvise a quick salad if you start with a serving of meat. The possibilities are really almost endless–just follow your own taste.

A son goût! 

A simple supper

When I did the smoked lamb and goat shanks for the Fourth of July I deliberately added some extras, even after I had allowed for the appetites of my guests.  What was left after our dinner was not “leftover” but was planned (even though I had nothing specific in mind just then) as future food since I thought that these would lend themselves well to improvisation.

I sliced some of the meat very thinly from the cold shanks and used it in a salad.  The goat meat was especially good here, but the lamb made a nice salad addition too.  There was still enough for one all-meat meal, or two meals if supplemented with a grain or beans.

Lamb and beans heating in skilletI had envisioned using the rest of the meat with some cannellini beans  to make a kind of mini-cassoulet that would be topped with bread crumbs and baked briefly to meld the just-added seasonings. That was just not on the program!  It’s been so hot lately that I just did not want to have the oven on even with the air conditioning running, so I opted for a “skillet” meal.

My first step was to sauté some chopped onion (1 medium) until soft and starting to brown, then add  garlic (2 large cloves, minced).  Next I added the chopped meat from the lamb and goat shanks.  I had enough for two servings–and I decided to use it all in this concoction as I though I would like two meals from this as it would only improve with reheating. I added about 1 teaspoon of herbs de Provence(seemed rather cassoulet-like) and a healthy dash of crushed red chili peppers for some spice, and about 2 tablespoons of water.  Finally I drained, rinsed and added one can of cannellini (white) beans to the skillet, which I covered and allowed warm over low heat to hydrate the herbs de Provence and the pepper flakes.

Without further ado it was time to eat. With the last of the bottle of wine that was Lamb with white beans and sliced tomatoesserved with the original meal  it was a very satisfying, and easy, meal. There will be one more serving (and that’s not a “leftover” either–maybe that will make it into the baking dish with the bread crumbs and some rosemary added. This could adapt well to any extra pork, beef or chicken that happened to be hanging about the fridge as a leftover.  All this needed was a salad to complete the  meal.  Dessert was just some fresh fruit.

18 July 2011

Just a quick update here.  I’m glad I made two serving of this.  The improvement on re-heating was fantastic.  The smokey flavor came out more–next time I do something like this, I’ll plan to make it one day and reheat it later.  I’d love to try this with goat!