
It’s one of the things that I couldn’t do without in my kitchen. There are lots of options out there, but only a few really good ones. From Bon Appetit–some thoughts on cutting boards, with some good links to discussions of what’s best and why.
Hive report: 30 July 2017
The weather was lovely today–low humidity, sunny, not terribly hot–a mere 81°F with a nice breeze–so I took advantage of it to do hive inspections when the conditions were good for me and for the girls. They were pretty cooperative today though just a bit tetchy when I first opened the hive but that’s not unexpected at this time of the year when nectar is a bit scarce.
The girls in both hives seem to really like applying propolis to anything that doesn’t move–especially between the inner cover and the top of the frames. Prying the tops of the frames away from the inner cover was when the bees in the upper box got just a bit irked with me and switched from humming to buzzing–including a few that got in my face about it–that’s why we wear bee jackets or at least veils. Once I had the inner cover off the hive the bees did settle down and let me do my thing.
Both colonies are looking good–a reasonable population of bees, good brood pattern, honey and pollen storage although there were enough varroa mites present on the sugar shake that I started treatment today on both colonies with ApiVar (Amitraz) strips since we still have some hot weather coming. That’s part of getting ready over-wintering.
Ò¿Ó
…
More ways to use honey.
Now that the bees are here, thoughts turn to honey–even though it’s unlikely that I’ll be able to harvest from the hive started from the package of bees that I got on 14 April 2017–the bees must have a winter supply so that has priority over satisfying my desire for honey.
I found an interesting series of articles from Kitchn on honey and its use in cooking or just eating:
- 7 Tips to Help You Get Honey’s Sweet Spot in the Kitchen
- 4 Rules for Successfully Swapping Honey for Sugar in Any Baked Goods
- Shopping for Honey: What to Know About Honey Color, Varietals, and Finding a Honey You Really Love
- 5 Ways Honeycomb Upgrades Everything from Breakfast to Dessert
There are additional links within these articles to recipes using honey, and to a series on migratory beekeeping and production of varietal honey.
Varietals are so much fun. Even the seasonal variations on wildflower honey are special. Raw honey is much like wine–its goût de terroir–a reflection of the total environment where the bees forage.
A son gôut!
Ò¿Ó
…
Refurbished kitchen appliances….
This article from Bon Appétit might just be useful if you’ve been eyeing a new kitchen appliance: Where to Buy Refurbished Kitchen Appliances You Can Trust Online.
My Kitchen Aid mixer was bought refurbished and it’s been fine. I’d do that again for another appliance that I’ve been coveting, given the savings. I’m glad to know about the other possible sources here.
Swedish cabbage pudding
From The New York Times cooking section by Sam Sifton:
Good morning. I dropped by a friend’s house the other day and found her cooking a Swedish kalpudding, a kind of cabbage meatloaf: layers of butter-sautéed cabbage and ground beef cut through with bread crumbs and cream. It smelled fantastic. I couldn’t stop thinking about it. I wanted to make it right away.
Now I have, and now I think you should, too, an early-week no-recipe recipe that you could knock down on a Monday night with ease.
You’ll need: a small green cabbage and a big knob of unsalted butter. Also: a pound of ground pork or a mixture of ground beef and pork; a small onion, peeled and diced; a cup of cream; a few tablespoons of bread crumbs; and (two cool additions I picked up from reading the chef Magnus Nilsson’s version of the dish in “The Nordic Cook Book“) a healthy pour of golden syrup and a splash of soy sauce.
Shred the cabbage and caramelize it in a pan with the butter and the golden syrup (use a mixture of molasses and light corn syrup if you can’t find golden, or a spray of brown sugar, or just omit because we shouldn’t be eating so much sugar, anyway). Let it get really tantalizingly close to burned. Then mix about a third of that with the meat, onion, cream, bread crumbs and soy sauce, along with some salt and pepper, and mold it all into a buttered loaf pan. Top with the remaining caramelized cabbage, and bake in a 350-degree oven for about 45 minutes.
Serve with boiled potatoes and some lingonberry jam. If you don’t like it, I’ll fashion a hat out of beef liver and eat it with onions.
Beekeeping: oops–keeper oversight!
We had a few days of delightful (read low humidity) weather here. I’m a fresh air freak. If at all possible (even with spring pollen), I’ll have doors and windows open while I work in my office, or even while sleeping (well only the door to the second floor back porch open). Last night I went to sleep while reading–not unusual but that meant that my reading lamp didn’t get turned off. Usually, no big thing but this turned into a really BIG, HUGE thing.
I was awakened a few hour later by an infestation of moths bumbling into me, and by Frankie (the cat) tearing around the room and tromping all over me and over furniture. I don’t mean one or two moths had managed to sneak in from the screened back porch as expected in North Carolina in the summer. This was a major invasion, and being attracted to the reading lamp, the were bumping into me. Frankie
This was a major invasion–I quit counting when I got to 13 of them. Besides, it’s difficult to count moths that are practically zooming around the room. Frankie was obviously having a lot of fun. For me, I was not in the least amused.

Lesser wax moth from BAMOA
These were not the really neat ones that you love to see like a Luna moth or a Sphinx moth–these were rather plain looking brown ones–a bit smaller than the ones that usually wander in to visit. These were very active, smaller and, as it turned out very hard to kill. Everywhere I looked there were brown moths practically buzzing around. Believe me, these guys do not flutter pleasantly as most usual brown moths do.
Now I’m pretty tolerant of insects. My first response is not “kill”; it’s usually catch-and-put-outside, but there were just too many in my bedroom; I opted for kill mode. I will admit to keeping insecticide at home for occasional use but not often since I do share the house with Frankie.
So I got the spray can and went to work. Weird thing, the insecticide that I usually use (that has usually worked on anything I needed it for) didn’t kill them–it seemed to only make them agitated and flying around faster and more furiously. That kill option failing, I opted for my other kill option–an old fashioned fly swatter, with a chair and step ladder strategically placed for hopping up and down. (These seem to be one of the few things that I found that Frankie, the cat, really got off on chasing and playing with although he wouldn’t kill them.)
That kill option failing, I went to something more direct–an old fashioned fly swatter, with a chair and step ladder strategically placed so that I could hop up and down to reach the ones on the ceiling. (While I’m doing my up, swat, down, up, swat, Frankie really got off on chasing and playing with them although he wouldn’t kill them.) In retrospect, I suspect this might have been a candidate for one of those “funniest video” programs.
As I got more awake, I had a horrible thought.
I had been sorting some frames from my hives that I lost late last fall. The frames had been stored with 
Extermination in the bedroom finished, I went back to sleep.
On exploration of the porch next morning I discovered that I had, indeed, overlooked some frames that still had some foundation in them–they’d just gotten pushed to the side a bit, out of sight, and left in our lovely summer weather. It was now very obvious where all of the moths in my bedroom had come from. Not a pretty sight!
There were more of them, many more of the, on the porch, clustered around the ceiling–a veritable plague of the critters. The fly swatter was not an option for dealing with this. So, to the grocery store for the most potent insect spray I could find–after sufficient label reading to really confuse me I just opted for the Black Flag for murdering these flying insects since that was the most lethal sounding product there. Even with that, it seemed that they didn’t succumb as rapidly as most six-legged wildlife.
I’ve since found instructions for a trap for wax moths (on Bee Works). This was to be hung around the hives to catch them outdoors rather than letting them go into the hives although a good strong colony will control them– they can quickly become a problem if the colony is weak. I have seen how quickly they can take over when a hive is failing.
Several days later, I seem to have successfully wiped out the population of wax moths on my porch and in the house. Frankie seems to miss them as entertainment, but I’ve now had all the experience with wax moths that I want–either in the hive or especially in the house.
Hive report: a real quickie….

Washboarding bees
I’m such an awful wimp when it comes to heat and humidity. I was planning to inspect both hives today since I would be replacing the empty feeding buckets with full ones. I put additional supers on both hives but I thought I should see how much comb had been drawn in them.
With a heat index of 102°F (even with the humidity relatively low–well actually low for here) I didn’t last long in the bee suit. It’s really frustrating trying to see the world with sweat drops on the bee veil (yes, I was wearing a headband to try and sop it up).
Instead of the more detailed inspection that I had planned, I opted to simply remove the inner cover and see how many frames had been drawn in each one. The Durham bees (the ones from here in town) had drawn comb on almost every frame in the super. The Georgia bees (the package) had drawn enough comb in the super that I decided both hives needed to have a super added before I put the feeders back on.
I still need to do a full inspection before long to check for mites and all that good stuff, but for now, I think I have two healthy hives that are doing what bees do.
Ò¿Ó
The bees are displaying an interesting bit of honey bee behavior: both hives are washboarding. It’s something honey bees do (apparently adolescents), but no one knows what they are really doing, or why. I found a reference that said the do it more on surfaces with more texture, but nothing to say what they are really doing. They just spread out on the hive (usually the front, though the bees from one hive are spreading over onto the sides as well) and are rocking back and forth, doing something with their mouthparts and front legs.
Is it just the adolescents out for a disco day?
Ò¿Ó
…
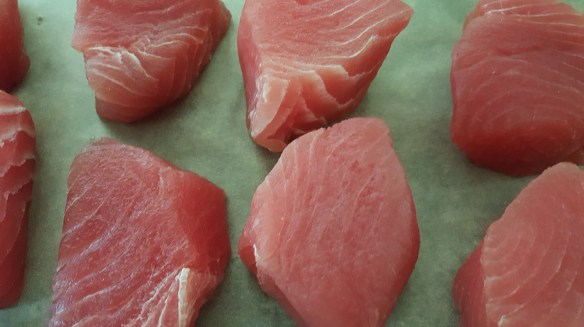
Tuna, lovely tuna!

those lovely tuna medallions
Wow! While skulking through Harris Teeter supermarket I noticed that they had beautiful tuna “medallions” for only $6.99 per pound. The chunks are not a problem for me since if it were steaks I’d need to cut them up anyway. The main thing is the quality and the price. It’s time replenish my supply of tuna confit.
Since my last post on tuna confit, the recipe from that post, which was from Fine Cooking, I’ve been perusing sous vide recipes and have come up with some modifications for the seasonings, and the method. I’m using the method from ChefSteps this time around (with a little modification of seasoning and cooking time and temperature). One modification was to infuse the oil with some additional herbs suggested in other recipes, and then straining/filtering the oil before packing the confit (in Mason jars).
Tuna Confit (2017)
Ingredients
- tuna (about 2 pounds)
- salt and sugar (4:1 ratio) for the dry cure/dry brine
- extra virgin olive oil, about 4 cups (enough to cover) the tuna
Infused oil ingredients
- extra virgin olive oil (about 4 cups)
- Turkish bay leaves (2 or 3 depending on size)
- sprig of thyme
- sprig of rosemary
- smashed garlic cloves (about 3)
- black peppercorns (about 2 teaspoons)
- red pepper flakes (just a dash)
- zest of one lemon (removed with a vegetable peeler)
Preparation
- Infused oil:
- Place the oil in a slow cooker or multifunction pot on the warm setting and add all seasonings.
- Allow oil to infuse for several hours (a temperature of about 150°F) then cool the oil to room temperature.
- Tuna:
- dry cure/dry brine the tuna for about 30 minutes then rinse, transfer to plate and let it dry.
- put the tuna into 500 mL jars, pouring oil around each piece, adding enough to cover the tuna in the jar
- cook in a multifunction pot on the warm setting for two hours
- cool tuna and refrigerate
__Ò¿Ó__
When I tasted the oil, the flavors were a bit strong so I diluted it with an additional cup of extra virgin olive oil before using it to pack the tuna. Since the oil had lemon zest added during the infusion–I didn’t add lemon zest to the cans as the ChefSteps recipe had suggested. I think that would have been just too much lemon for even me–and I do like lemon!
My “medallions” were a just little thicker than the usual tuna steak so I allowed them just a bit of extra time with the dry cure (about 45 minutes) before rinsing and allowing them to air dry. There was a big difference in the firmness after that short period of dry cure.
After rinsing and patting dry with paper towels, I left them sitting on parchment paper for about 30 minutes to air dry, turning them over just once, then packing them in 500 mL Ball/Mason jars, adding oil to the bottom of the jar, and then after each piece of tuna
__Ô¿Ô__
The ChefSteps recipe suggested cooking the tuna at 113°F for 1 hour and 30 minutes. My experience has been that, even though I love sashimi, I like my cooked fish cooked just a bit more. Part of the reason for making confit is not to eat it immediately but to be able to keep it longer as my replacement for “canned tuna”–so I’ve opted for a higher temperature–actually a lot higher temperature–more in keeping with the original recipe.
The jars of tuna in olive oil were put into the slow cooker on the warm setting which should give me about 160°F. I know that’s not going to be as lush and velvety as if it were cooked at a lower temperature. But preservation is part of the objective here (I mean, that was certainly the original goal of confit). I want this to last (in the fridge) for a bit.
Jar size was a bit of a problem–three of the medallions were simply too large to be sure that they would remain submerged under the oil, even allowing for shrinkage with cooking. Since the jars were going to be sealed, I didn’t want to take the chance of having to open them to add more oil. So–extra room in the jar with only two medallions in each.
No matter how this turns out it will be hands down better than most canned tuna (unless you spring for the really expensive stuff) and a lot easier than doing it on the stovetop or even in the oven.

dry curing
air drying after curing

starting with oil in the jar

add tuna

leaving some headroom in the jars

it’s tuna confit!
__Ò¿Ó__
…
Beans & Rice
This was a kitchen happening–not really a recipe with given quantities of anything–just because I wanted rice and beans. Everything is flexible, depending on your taste and  how many servings you need. (I wanted to have some extra to put in the freezer for quick side to grilled meat.)
It’s SO hot here that cooking just isn’t very appealing even with air conditioning on. One of my solutions is to eat things can be prepared without turning on the stove. I did this in the Krups multi-function pot that I love and use in so many different ways. (Tomorrow I’ll be using it to make tuna confit since my supermarket had lovely tuna medallions on a really special sale. That will keep me in tuna for my summer salads for a bit.)
Black Beans & Rice with Chorizo
Ingredients
- rice (about 1 cup)
- olive oil (healthy dollop)
- onions, chopped (lots)
- black beans
- salt and freshly ground black pepper
- canned diced tomatoes with green chilis
- red pepper flakes (dash)
- pimenton (dash)
- Mexican oregano (good healthy pinch)
- pork chorizo (about 1/2- to 3/4-pound fresh)
- water or extra tomato juice/V8 juice as needed for the rice
Preparation
- Sauté onions in olive oil until translucent and starting to soften
- Add red pepper flakes, pimenton, oregano, salt and pepper and sauté until the spices are aromatic
- Add chorizo and sauté until it starts to turn opaque
- Add canned tomatoes
- Add rice and black beans (canned or frozen)
- cook until rice is tender
Ô¿Ô
It’s hot and humid here, and I was being particularly lazy, despite my desire for food so I did this in the multifunction pot. I did make this as easy as possible–frozen chopped onions, canned tomatoes, and frozen black beans (these from 13 Foods) but Stahlbush Island Farms also has black beans and brown rice that make a good starting place for this. The result with frozen legumes is much better than with canned, though those will work as well.
A note on the oregano–it was Mexican oregano which is definitely not the same as Greek or Turkish oregano. If you don’t have Mexican oregano, then I would substitute thyme or cilantro. I can’t get my head around the Greek or Italian with this mix of flavors. The pimentón (smoked Spanish paprika) adds a bit of smoky flavor.
I first measured my rice so that I’d know how much liquid needed to be added to have it cook to proper doneness. Everything else was added (as indicated) by the dash, dollop, or pinch.
The chorizo that I used was fresh, made in-store from my Harris-Teeter supermarket, and not in casings so all I had to do was break it up into the pot to sauté. Couldn’t get any easier. If you can’t find “loose” then just remove from the casing, or put the whole sausages in to make this a meat-centric dish.
Everything was sautéed using the rice cooker setting with the lid open. Quite quick and easy although it does require a little attention. Once the tomatoes (with juice) and beans were added, with just a bit of spicy V8 juice to give enough liquid to cook the rice, the lid was closed, and I went away to do something else–until my meal was done. The caveat here is that you do need to be sure that the amount of liquid is appropriate for cooking the rice–too much and you’ll have “blown out”, mushy rice; too little and it will still be crunchy–you’ll need to add more liquid and continue to cook until tender.
Quantities and totally flexible–maybe you like more rice than beans–or the other way round. I love lots of onions, but if you don’t, then just don’t use many. The proportion of chorizo depends on how meat hungry you are–it can vary too, from almost a seasoning to a lot. Next time I make this I will add just a bit more than I used this time, although it was quite good this way.
A son gôut!
Ò¿Ó
…
The freezer jumble
I use lots of frozen vegetables since it makes cooking single servings much easier without having to waste produce. Then there are the soups that come out in large quantities so some goes into the freezer for later. I do use zipper-lock freezer bags and store things flat, try to label everything, but it still seems that a jumble results eventually no matter how good my intentions.
Then there comes the yearly clean-out-the-freezer adventure. I have a bottom freezer on my refrigerator and a chest freezer (without any bells and whistles) on my back porch. I try to synchronize the cleaning process so that I don’t have to haul out the humongous cooler while I’m doing it. The chest freezer has to be defrosted which means it’s a warm-weather task.
My email from the Kitchn had an article that was very timely as the yearly troll of the chest freezer is imminent: “The Best Freezer Organizing Hacks on the Internet” and I discovered the category of “freezer intelligence” that includes information on packaging and what can (and can’t) be frozen.
Even though I’m doing some things right, there were some trucs that I’d not (and probably would not) have thought of. Some of these ideas just might help me avoid the avalanche from the under-refrigerator freezer and with organizing the chest freezer as well.
Ô¿Ô
…
