Christmas dinner

I’m having my usual lazy Christmas day–just me and Frankie (the cat). After having brunch of scrambled eggs with truffle butter, I turned my attention to fixing supper.

It seems that I’ve inadvertently created another Christmas tradition (aside from the oysters): chicken (or at least fowl) in a pot. I guess it has something to do with it being an easy and tasty dish that I really like. This year, though, there was a variation–it’s pheasant in a pot. It’s been awhile since I’ve had pheasant so that’s what came to mind for this Christmas supper. After-holiday sales, and sometimes specials in between, are great for eating higher-on-the-hog with lower prices–so there was a plump McFarlane pheasant, just a bit shy of 2.5 pounds, lurking in the freezer.

20161225_134929

…giblets removed

I toyed with cooking the pheasant with milk as I had done before with cornish game hen, but somehow I just couldn’t picture the pheasant-milk combination. So, just plain pheasant in a pot.

I couldn’t think of any reason that pheasant wouldn’t work just as well as chicken for this treatment–but since a pheasant isn’t a chicken, I thought there would have to be a little adjustment.I little skulking about (via Google) suggested that my pheasant should cook in less time than the bigger chicken (duh! About an hour or a little more). Cook’s Illustrated has a basic recipe for chicken in a pot; that seemed a good place to start since there’s always a rationale included that should make the recipe easy to modify as needed though it seems that none of that series (Cook’s Illustrated, Cook’s Country, or America’s Test Kitchen) addresses pheasant.

So, next, seasonings for the bird. Pheasant may be considered one of the “other white meats”, but it’s still more like the dark meat of the chicken: bay leaves (certainly), onion (can you cook without onion?), garlic (often used with pheasant), thyme, sage, and juniper berries (good with game) were the final seasonings that went into the pot. I also added some sliced button mushrooms with the onions while they were sautéing. These are eye-ball measurements:

  • one large onion, chopped
  • 2 bay leaves
  • one basket sliced mushrooms
  • 1/2 teaspoon thyme
  • large pinch rubbed sage
  • 1-1/2 tablespoon minced garlic

20161225_140238

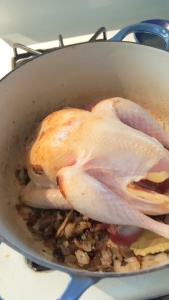
After browning the pheasant breast-side with the onions and mushrooms, the pheasant was flipped, seasonings added, and the pot  covered with foil and the tight-fitting lid, and it went into a 250ºF oven. Time to consider what I wanted for sides to this lovely bird.

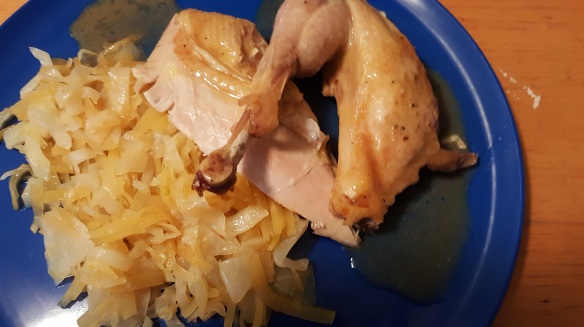
My peasant side is showing–well, right along with bird-in-a-pot which isn’t exactly haute cuisine unless you are eating in in a US restaurant–I  rummaged through the vegetable bin and decided that something with cabbage and rutabagas would fit with the dark meat.

After some more Google use and letting my imagination run wild for a bit, it seemed something quick and easy would be a sautéed combination of those two vegetables, spruced up with a bit of a sauce of some sort. Something sweet-tart–maybe some dark buckwheat honey and lime juice and zest of one lime). I did a little shredding, julienne work (mandoline), and zesting  I left those veggies sitting in water to await cooking time; the buckwheat honey and lime zest melding; then I was off for some more quality time with the cat for an hour (until time to check the temperature of the meat (one of J.J. Salkeld’s  Lakeland mysteries).

While the bird rested (about 15 minutes or a bit more), I put the drained cabbage and rutabaga in a sauté pan with a dollop of butter (salted) and covered them–sort of a steam-sauté–until almost tender then removed the lid to let moisture evaporate while I tossed this mixture around a bit with my sauce (about 10 or 12 minutes altogether).

After scraping up all the good brown stuff from the pot, the juices from the roasting pot were strained, and enriched with a blob of truffle butter. End of cooking–time to eat!

Just a word about en coquette cooking: the meat is absolutely luscious, but don’t expect the same kind of browning that you’d get with dry-heat roasting. I can attest that it works very well–as well as braising–with farm-raised pheasant. I’ll most likely do it again with the next pheasant I decide to eat.

The cabbage/rutabaga combination turned out to be even better than I had expected–always a pleasant surprise–even before the sauce went on. Just with the butter it would have been an admirable side to the pheasant. The mandolin made short work of both the shredding and the julienne work and the cooking time was only about about 10 or 12 minutes. I have to admit that there are leftovers from the 1/2 rutabaga and 1/4 head of cabbage. (I’m thinking that they could be turned into rösti or fritters for a main course since I didn’t add the sauce to the entire batch of cabbage and rutabaga.)

Wine? Of course, but since I had some of the Les Hérétiques left from last night, I decided I’d just go with that–it’s a good all purpose wine–maybe not what I’d have chosen were I giving it a lot of thought, but sometimes it’s a needs-must situation–I love my wine vinegar but there’s a limit to how much good wine I’m going to pour into that jar. So–I finished that bottle this evening. The “leftover” wine was quite good with this combination of food–the blackberry was a nice contrast to the other flavors here.

Ò¿Ó

If I want to sound really fancy, I guess I just ate pheasant en coquette with truffle  au jus–whatever you call it it was a fine meal, even if I can’t get the cat to say so though I’m not that modest. I’m still listening to Christmas music and enjoying a another glass of wine. The other half pheasant has been boned and stashed, and the carcass is in the slow-cooker making pheasant broth. I’m not sure what is going to evolve out of the Christmas Eve and Christmas Day leftovers, but I would guess that there is going to be some pheasant soup, among other things.

The kitchen is tidy–only the roasting pot left to soak with baking soda overnight–and only clean things to put away from the drainer in the morning. Altogether a most pleasant day with the cat, low-intensity, undemanding cooking, music, and reading.

I was contemplating starting to filter my chocolate/cardamom/ancho/golden rod-aster honey liqueur this evening, but I’m just too full and lazy. I decided it would be better to start that in the morning since it is a long process–so now to quality time with the cat and Kindle since I’m happily fed and still enjoying wine.

I hope all of you had as pleasant a day as I did. A final happy holidays to you if you happen to be celebrating something just now.

20161225_162137

20161225_163944

Ò¿Ó

.

Christmas evening supper

Christmas eve–what’s for supper? Your basic duck breast, pan-seared and dressed with some of the spoils of my visit to Bull City Olive Oil. Just a take-off on a vinaigrette, but what fun. A nice fatty duck breast pan-seared so that the skin is cracklin’ crispy–with a very simple sauce–fruity.

Turn off the smoke alarm so you won’t be interrupted while cooking. You need to start with a skillet that will tolerate high heat–it needs to be almost smoking hot to begin–and no worries about sticking given the fat in the duck skin. I used my favorite carbon steel skillet–very well cured (now black and nonstick), and has the advantages of cast iron, without the weight. Just the right size for two duck breasts.

20161224_173256I had thought that perhaps just a drizzle of one of the infused vinegars would be good, but after tasting the vinegars with a piece of breast that was loose in the package, I decided it needed  more complexity, so I started with  extra-virgin olive oil infused with mushroom and sage–awesome as a condiment in its own right, but for nice fatty duck it needs to be brightened a bit with one of the infused balsamic vinegars. Decisions, decisions!

I had black mission fig, black cherry, and blackberry with ginger. After tasting I decided that blackberry-ginger was what I wanted this evening, though any of these would have been good with duck. I didn’t use typical vinaigrette proportions but I did emulsify the oil and the vinegar (1:1). The mushroom-sage oil is very earthy and a great contrast to the fruitiness of the blackberry with that little spark of ginger.

20161224_174026To prep the breasts I patted them dry and scored the skin side, careful not to cut into the meat–just to help the fat render while pan-searing. You need a very sharp knife so that just the weight of the knife pulled across the skin will cut into it. Then I salted the meat side of the breasts and let them sit for about 20 minutes to season.

After patting them dry I put them into a  very hot skillet, skin side down, and cooked until most of the fat rendered and the skin side was brown and crispy (about 5 to 8 minutes), reducing the heat a bit to keep them from getting too brown before a sufficient amount of fat had rendered. Then turned them and continued to cook until the temperature was 135ºF by instant read thermometer (about 5 minutes).

While the breasts were searing, I whisked the oil and vinegar together, and got the roasted potatoes out of the oven. While the breasts rested (and continued with carry-over cooking), I poured off the excess fat from the pan, left just enough to  sauté a mix of  baby arugula and radicchio for a side. Very quick. Very tasty!

The bitterness of the arugula and radicchio was a great contrast to the richness of the duck, and the blackberry-ginger/mushroom-sage sauce. (Blackberry and sage are awesome together–makes me want to try a sorbet with that combination.)  The Les Hérétiques wine (old vine Carignane grapes) has lots of berry fruit (blackberry  with some earthiness, and minerals) all in all a great wine for this meal even though it’s just my “house” wine.

All together a very flavorful supper for no more time than it took.  So many possible flavor variations possible with this simple sauce. A son gôut!

Ò¿Ó

.

Supper for a chilly evening….

If it were not that my outdoor thermometer is reading 46ºF I’d be calling it a snow day–grey, chilly, misty, damp, dreary. It seems like a day for “oven food”. While the oven is on, the heat won’t be coming on as much. Food and warmth in one.

I’ve hit the time when cleaning out the refrigerator becomes a necessity–not that I had anything about to grow legs and crawl out, just things that should be used, and it’s also time to rotate stuff from the freezer, too. So a browse through the fridge, the freezer and from the counters is making a meal–a one-pot meal. I did have go to the grocery store because this kind of weather calls for potatoes–and I had only a baking potato in the house–and those just don’t do for braises. So, leaving the Romertopf to soak while I   went to do cat care for a friend and got some potatoes and then started to see what would b_shank_crop_20161204_153707happen for supper–it’s a no-recipe event this evening.

I scrabbled around in the freezer and came up with a very large beef shank (with marrow in the bone), the refrigerator gave up some under-cooked collard greens ( I attempted to cook them in the slow-cooker–not recommended if they are older greens). The counter yielded some cherry tomatoes that were getting wrinkly, and there were some sliced shiitake mushrooms loitering in the fridge.

Even though it’s the weekend, it’s a working day for me so I’m doing lazy cooking. All of b-shank-covered_20161204_153715
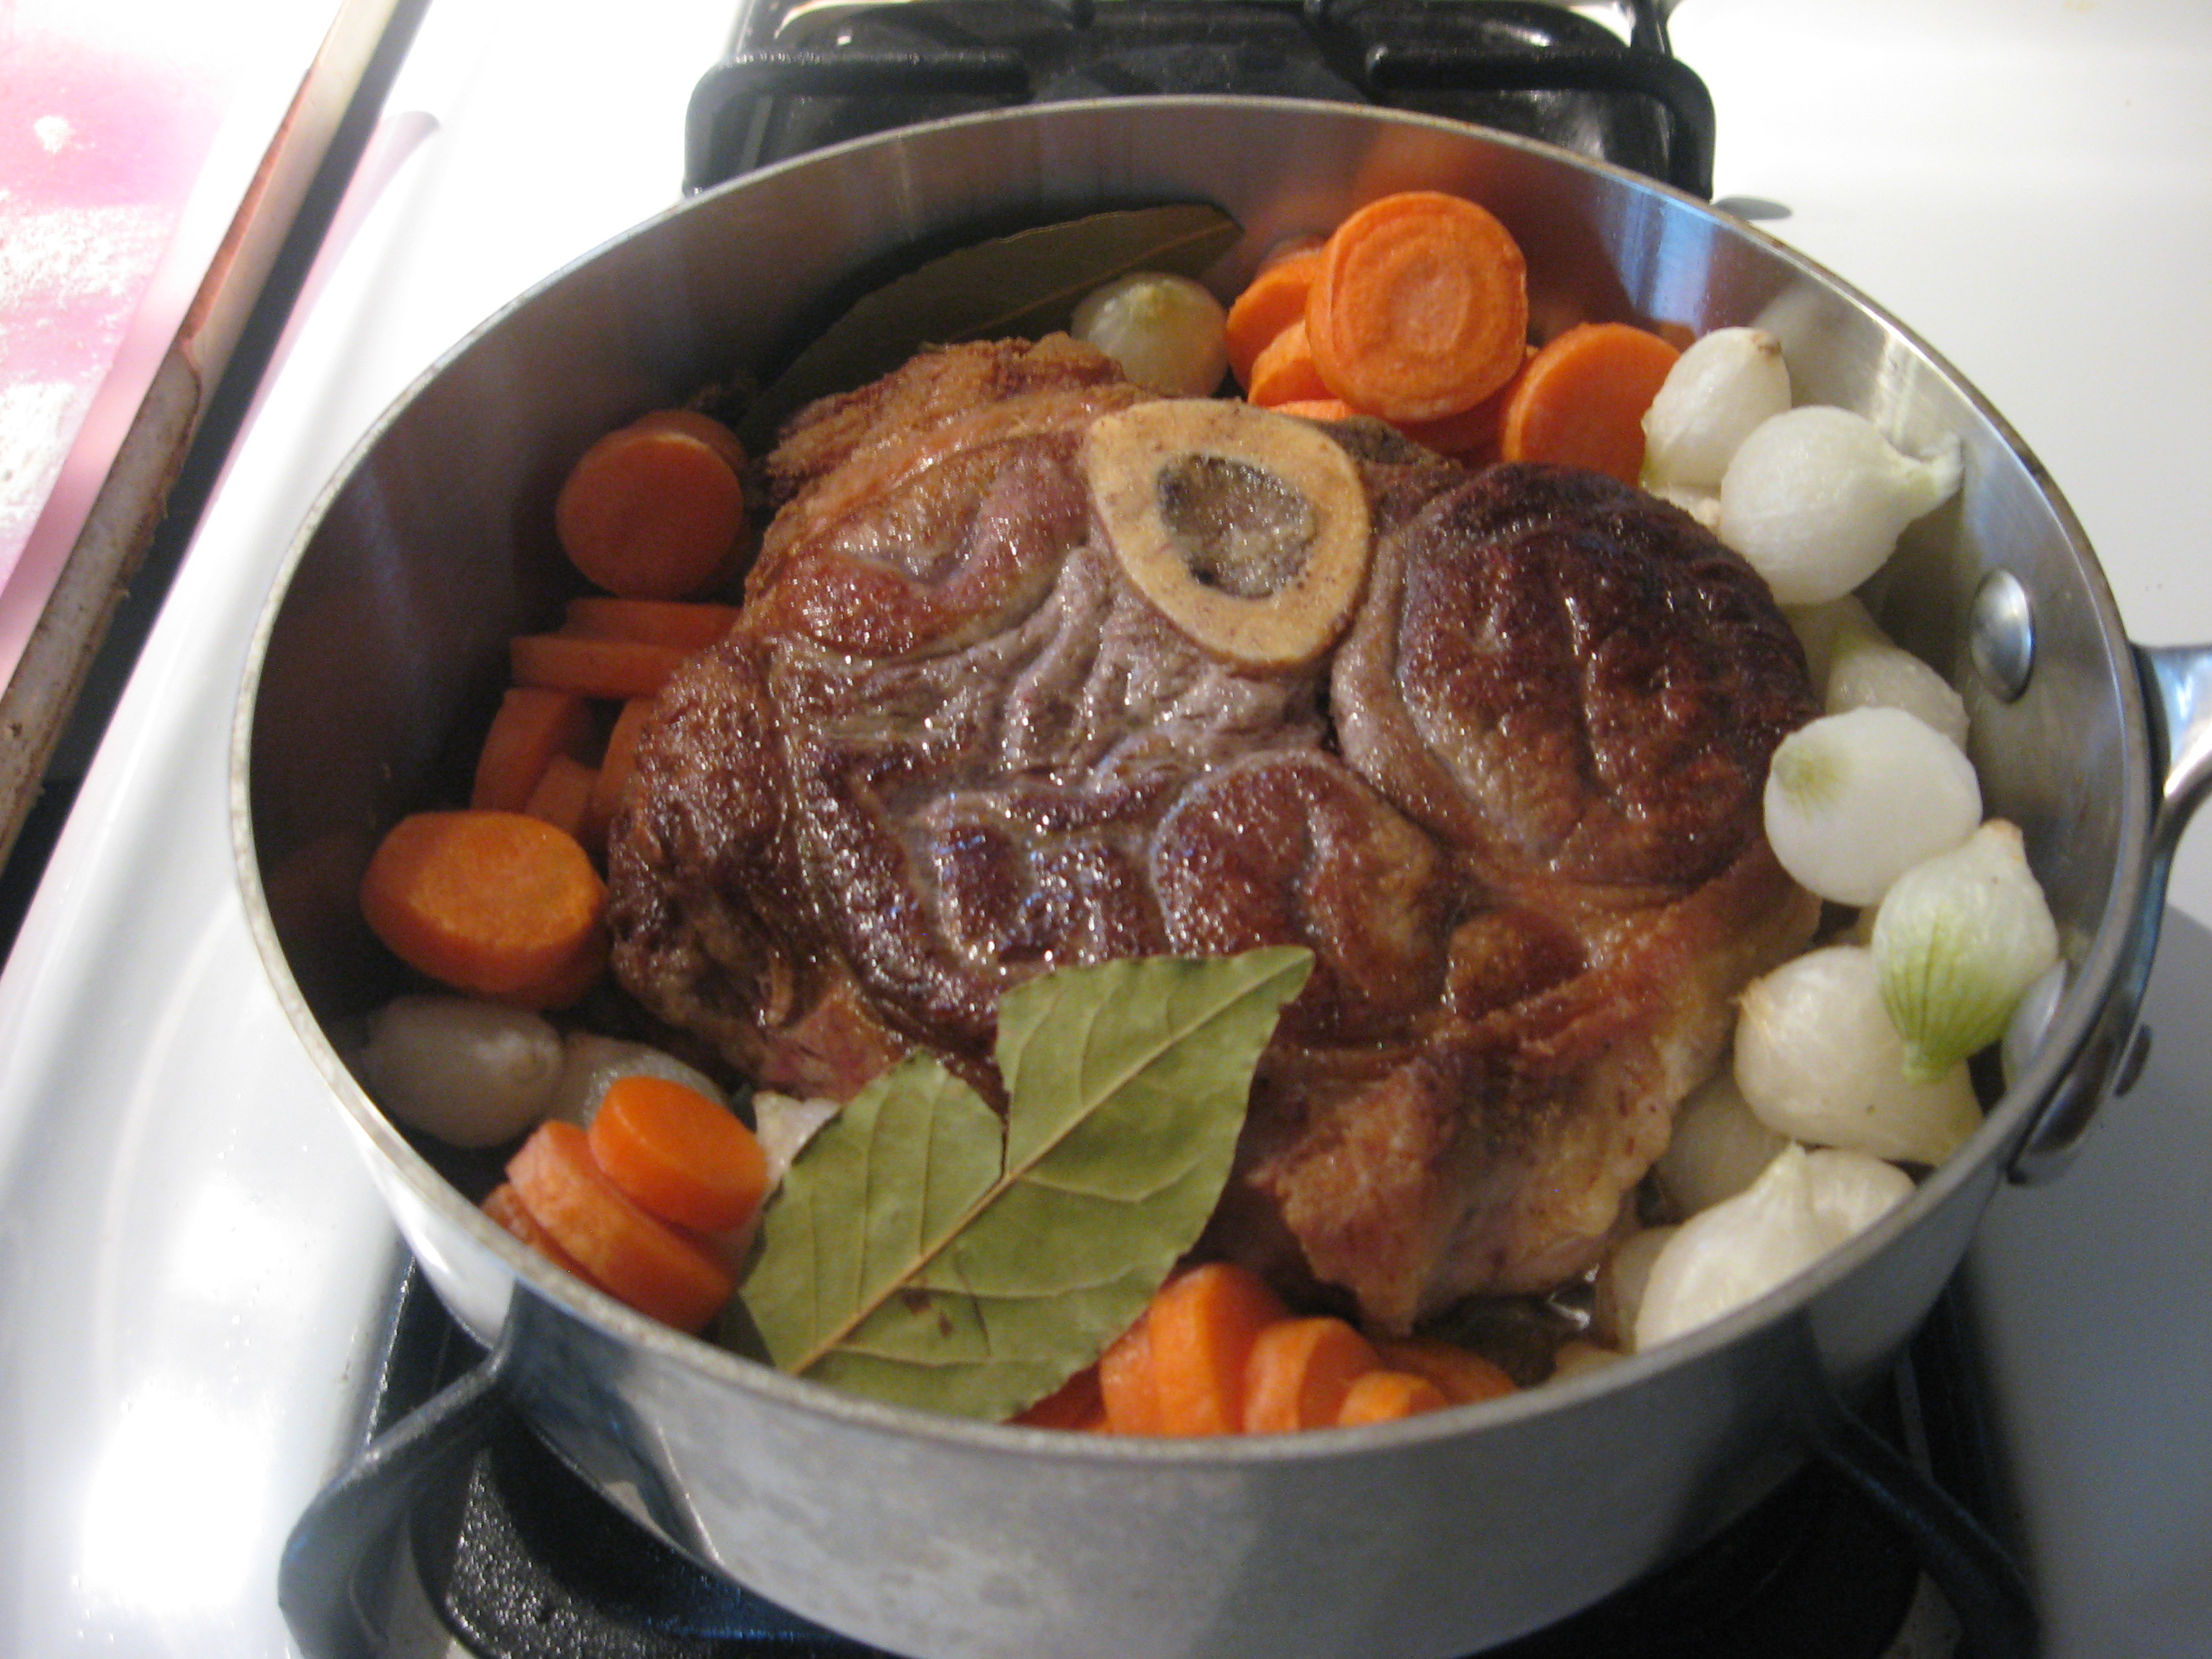
the above-mentioned items went into the soaked Romertopf–with bite-size Yukon gold potatoes added. I did my lazy herb seasoning (herbs de Provence), lots of garlic cloves, and then those cherry tomatoes that had wrinkles. Add a couple bay leaves, salt and water, and put it into a cold oven set for 350ºF–a kitchen happening. Had I soaked the larger Romertopf, I would have added some rutabaga and carrots too–but those looked as if they could linger for just a bit longer in the fridge. Now–to work!

ò¿ó

Today has been one of those frustrating days when I’ve had difficulty really concentrating–even though I didn’t have to attend to cooking supper. For all the true productivity I might as well have been in the kitchen cooking. Even without any attention, about three hours later, I’ve a really tasty meal–quite suitable for the weather tonight.

20161204_200628It may not be styled and truly photogenic, but the beef shank was very tender–but very beefy–it’s one of the things that is great about some of the less popular cuts of the cow.  The smoky, earthiness of the shiitake mushrooms, the mellow flavor of the roasted garlic made a great contrast to the bitterness of the collard greens (these took a lot of cooking to get them really tender). The healthy dose of bay and herbs de Provence really added a lot of flavor. I did finish my plate with a drizzle of herbs de Provence infused olive oil (Bull City Olive Oil). To accompany this casual meal I had a glass of 1999 Domaine Cros Minervois wine. Just the ticket to go with the very “beefy” beef and the collard greens!


A great supper for a rainy, damp, chilly evening. A successful kitchen happening without the vestige of a recipe in sight.

A son gôut!

shank_plate_20161204_200706

Õ¿Õ

.


Turkey–with truffle butter

Thanksgiving does have its good points–getting together with friends! There’s another positive thing, especially if you are like me, someone whose favorite part of the turkey is the dark meat: you can find turkey thighs in the grocery store. That means dark meat in quantities suitable for cooking for one.

Perusing my food-related emails a few days ago I found one from D’Artganan–my favorite source of foodstuff that can be hard to find (e.g. the cassoulet  ingredients–no, I didn’t say it was inexpensive). There was a link to a delightful video on preparing your Thanksgiving turkey using truffle butter. (Attempting not to drool on my keyboard.)

You’ve seen from some of my previous posts that I really like truffles (not the candy–well, those, too, but…), even in my comfort food. In my attempts to be frugal and still indulge my tastes for the expensive stuff I do skulk through the “manager’s specials” and those carts full of end-of-season bargains. Sometimes I’m lucky and find an indulgence elsewhere. Not long ago I found a small tub of truffle butter at my local supermarket–marked down as it was lingering with the cheese and spreads, but not past it’s sell-by date. Needless to say, it came home with me–some of just have no willpower when it comes to food!

20161119_165833
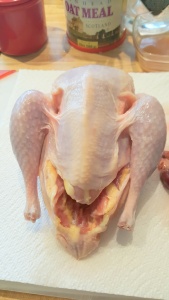
After seeing the turkey with truffle butter video, realizing that I had truffle butter, and turkey thighs to hand, I decided to try  turkey this way. I decided (since I was roasting all dark meat) to use my Schlemmertopf  for this. I carefully loosened the skin over my turkey thighs, and as directed in the video, put bits of truffle butter under the skin. After soaking the clay cooker properly, I patted my turkey thighs in, sprinkled some kosher salt over them, and put the pot into a cold, 300ºF oven for about 2-1/2 hours–until they were nice and brown, and very tender. (Many recipes will suggest oven temperatures of about 450ºF, but I chose to use a lower temperature because dark meat can tolerate longer cooking, and it often tends to be tough. I wanted slower cooking to break down collagen and make my turkey really tender.

The skin did shrink away from the edges of one of the thighs–I would rather have had one big thigh instead of two small ones, but it seems those haven’t hit the stores yet. Size and skin shrinkage aside, I had some lovely dark-meat turkey nicely flavored with black truffle. Turkey my way!

A son gôut!

Dicing onions

Ok, I’m lazy–even about some things in the kitchen–like dicing onions; however, I’m not at all sure that it’s possible to cook without onions.Being out of onions is like–well, my mind simply boggles at the thought.

800px-mixed_onionsI use lots of onions, meaning that I cut up a lot of onions, but I’ve never understood the “usual” way that we’re told is “proper” to dice onions. I can understand it if your onions are HUGE, I suppose, or if you have a touch of OCD (I may have, but not about diced or chopped onions). I’ve always thought that onions were essentially self-dicing with little effort on my part–after all they come with layers already there. Another aspect of dicing or chopping onions–I’ve never been one to expose myself to unnecessary risk so why the cuts parallel to the cutting board? (Yes, I know that you’re supposed to have your hand on top so it’s impossible to cut yourself. Be sure to check on that the next time you’re dicing an onion properly. Where’s you hand?)

My lazy approach has always been kind of a two-part thing: First don’t buy huge onions. Secondly, I bypass those horizontal cuts, doing only the vertical cuts. For diced, do the vertical cuts close together; for chopped, farther apart. Easy!

Recently, I stumbled over a video from The New York Times Cooking Techniques on how to dice an onion that omitted those cuts. How refreshing!

Since I’m doing single-serving cooking most of the time, I often use shallots. Then there’s the truly, completely lazy way to deal with the onions. For cooking purposes when I want chopped onions I often reach into the freezer for that bag of frozen chopped onions. If I want lots of onions for something like caramelized onions, then I’ll get out the knife and go to work.

Another lamb and garbanzo bean stew

Yesterday was the day for a trip to the supermarket–as usual dictated not by coupons but by me being low enough on milk that I was not going to be able to make enough caffè latte to get me awake and doing what I needed to do today. As usual, I didn’t go with preconceived notions of what I might bring home to cook.

I got my milk and eggs–just not possible to be out of eggs, but I was–and did my usual troll past the butcher counter. I found a manager’s special that was simply too good to pass up: lamb stew meat at a great price. Since my agenda today was mostly minor chores I thought I’d have time to cook, so I came home with lamb stew meat and actually remembered to soak (in brine) the garbanzo beans last night. You’re probably thinking so what?

Well, it’s fall and that makes me want to cook hearty stuff and lamb stew just seemed to be a really good idea: economical, tasty, some to go in the freezer for quick meals, and some to eat now. Unfortunately, the weather is not really cooperating–my thermometer is showing 82ºF right now–but at least it’s cooler in the evenings now so stew is not completely amiss. Still, so what?  Right?

Well, as I started my morning caffeination by browsing Facebook I was informed that I had memories from two years ago. Now I’m still not convinced the FB really cares about my memories, but the top item on the list was my post about making–yep!–lamb and garbanzo bean stew in the oven. Well, same today: it’s unseasonably warm again, but not too humid, and it’s sunny and breezy today so it’s oven rather than slow-cooker version this time. Since I did forget to soak the Romertopf  ahead of time, I just pulled out the Dutch oven instead.

I did look for recipes last night but didn’t really find anything inspiring, so today’s lamb stew was a “kitchen happening”–let’s just see what turns out. That two-year-ago lamb stew was an oven version of a slow cooker recipe. This year, given the weather I decided that I’d (again) do oven braising. (The slow-cooker version was good, but no way as good as the one done in the oven.)  I haven’t looked back to see what went with that version–all I really remember is that I used canned beans that time.

Oven-braised lamb and garbanzo stew (2016)

Ingredients

(I’m not giving much in the way of measurements here since this was a “kitchen happening”)

  • Lamb stew meat (about 3 pounds with some bones included)
  • Garbanzo beans (brined over-night)
  • Lots of onions (cheated and used frozen chopped ones)
  • Bay leaves–2 large
  • Salt about 1-1/2 teaspoons, give or take–will taste later
  • French thyme (dried)
  • Marjoram (dried)
  • Garlic powder (Oops–not a single head of garlic in the house!)
  • One 14-ounce can of diced tomatoes–drat, out of fire-roasted ones.
  • Smoked Spanish paprika
  • Olive oil as needed for browning lamb

Preparation

  • Brown stew meat (bones included; they will make good stock as the beans and lamb cook ).The bones are big enough to get out easily when the stew is done. Add to Dutch oven.
  • Saute onions until just golden, and add to Dutch oven with meat, beans, and tomatoes
  • Deglaze skillet with water and add to braising pot
  • Add  salt, herbs, and spices.
  • Bring to a simmer on the stove-top
  • Place in a 185ºF oven  and cook until beans and meat are tender–about 3 hours.

Ò¿Ó

Here I was, again, making this lovely stew in unseasonably warm weather but still cool enough to use the oven rather than the slow-cooker. Cooking my own garbanzo beans was well worth the thought and bit of effort that it took to soak them. Brining them seems to make them cook much more quickly. Leaving the bones in with the meat really gave a lot of lamb flavor–worth the effort of taking them out after the meat was done.

I love this combination of lamb and garbanzo beans–it seems that I’ve used different seasonings almost every time this “happens” in my kitchen, but it’s good every time! No recipe needed just season as you like…a son gôut!


There’s an app for improvisation

Cooking for one? Frustrated with recipe adjustment? You want to improvise but not quite ready to just “wing it”?  You want a fritter batter (for one or two) but the recipe serves six?

Using something other than measuring cups and measuring spoons can give you a lot more freedom in the kitchen. How to Cook without a Book will help you get away from the frustration of looking at the recipe that serves six and wondering how to modify it for you (and the cat). If you know cooking techniques (e.g. sauté or braise) you are well on your way to using that recipe for inspiration and adapt it to your needs and taste. If you want a good start on learning techniques, I would recommend you check out Michael Ruhlman’s Twenty that includes not only the techniques but important ingredients as well: water, onions, acids, eggs, butter, and flour for a start.  Now to take improvisation to the next level of freedom from recipes: using ratios of ingredients.

Ratio: The Simple Codes Behind the Craft of Everyday Cooking Cover ImageThe Ratio (link below) is devoted to explaining and working with ratios in the kitchen.  Topics in this book include batters (cake and bread), stocks, roux, sauces, and even sausages. Measuring by weight  (though not required) does simplify this process–and eliminate washing all those measuring cups and measuring spoons. Adjusting the amounts of main ingredients is straight forward, but this approach does mean that you will need to adjust seasoning by tasting–rather than simply mathematically.

There is an app that will put all this at your fingertips (links below). Let’s say your gardening neighbor has just gifted you a BIG bag of zucchini. You might think you can use some of them to make fritters as the main course for your supper. You can go the Google route–find a butt-load of recipes, most of which serve six, or you can use this app to check batters–and you’ll see a button for fritter batter. The “details” tab will give you more specific information: e.g. that each 4 ounces of flour and liquid will hold together two cups of garnish (your shredded zucchini) and that would make about eight nice, big fritters and some seasoning suggestions for both sweet and savory. This app is NOT free ($4.99 from Google Play via Ruhlman Enterprises); there are some issues with it–but I think it’s worth that small price.

The issues: The egg part of the ratio, since eggs come nicely packaged right from the hen. I learned the “ratio” approach from my grandmother she taught me to make a “pound” cake or “four parts” cake–since the egg was premeasured, we worked in egg weights and use an equal weight of each other ingredients–flour, sugar, and butter. This is easy if you use scales, but if not, then here are some ways to deal with the egg part of the ratio.

Weights of various grades of eggs for the USA and for other countries can be found in Wikipedia; additional volume information can be found on Get Cracking . Using this site you can find that a large egg (called for in most recipes) weighs 2.0 to 2.25 ounces (56.7 to 63.7 grams) and volume of 46 mL (3.25 tablespoons). Cup equivalents of eggs are found at The Incredible Edible Egg. Some recipes (custards and some sauces) will call for egg yolks only. To help on these calculations you need to know the weight of the yolk of a large egg is 17 grams or 0.60 ounces. Weights for other egg sizes can be found at  the {convert to} site. From this same  website you can convert that 1 yolk into cup measure: 0.07 cups, which is equal to 0.56 fluid ounces, or 1.12 tablespoons, or 3.37 teaspoons of egg yolk. (I doubt that you’ll be doing this kind of conversions–but it can be done.) Just to be complete,  the weight of egg white from large eggs is = 33 grams = 1.2 oz. The information for other sizes/grades of chicken eggs, as well as duck, quail, and turkey eggs, is also given.

Now suppose you want to make a small amount of custard (e.g. for quiche) you can use the calculator of this app to determine how much liquid you need. To do this by weight, enter 56.7 in the “eggs” and set units to grams. Now set the liquid units to grams as well–and the calculator will tell you to use 113 grams of liquid. (You’re saying you could have done that in your head–true, but now you click the “details” tab, and you’ll get a kind of “master” recipe with more instructions.)  Want Crème Anglaise using only egg yolks? Use the weight of the number of egg yolks, and the calculator will spit out the amount of cream and sugar you need, as well as the total weight. For two egg yolks, you would need 136 grams cream and 34 grams of sugar.

More on using ratios:

Happy improvisation with ratios! A son gôut!

Õ∇Õ

.

Monkfish sous vide

I’ve been thinking about sous vide cooking, reading about it, and I’m finally going to try it, especially since it CAN be done without any fancy equipment–except a beer cooler. That I can handle–in fact, I already have one–I just had not thought of it as a kitchen appliance.

I’ve been wanting to try sous vide cooking, especially reading about it Stefan’s Gourmet Blog posts. Being somewhat budget conscious, I’ve explored alternatives to the water ovens and circulators usually used in sous-vide cooking. I’ve looked at articles on how to turn your slow cooker into a sous-vide machine and discovered that requires some additional equipment and “hacking” to work; that’s also not for me.

There seem to be a lot of reasons for using this technique, not the least of which is to avoid heating up the kitchen and overworking the A/C! There’s also the appeal of the evenness of cooking and not being able to overcook unless you give a lot of attention to the actual cooking. All those advantages and some alternatives to expensive equipment or ones that require engineering know-how at least let me try it. One alternative I discovered was a big pot of water, low oven temperature–not an option in summer for me.  I found references on adding external temperature controls to rice cookers and multifunction pots, using the oven, and, of course, lots of ads for sous vide tools.

So what has precipitated this sudden fit of actually doing it? It’s the hot, muggy, humid, steamy weather we have here in the summer and the fact that I’m a serious fresh-air freak. If it’s at all possible I’ll have the doors and windows open–Frankie especially appreciates this. I want to cook without having all the extra heat–so I’m exploring all possible alternatives, including adapting recipes that normally involve using the oven for the slow cooker–looking for ways to beat the heat.

Krups rice cooker IMG_3796

For food safety temperature is important so I looked at lots of articles giving temperatures for various meats and fish, including on that considered using the keep-warm function on the rice cooker or multifunction pot. Next to the beer cooler method this looked like a possible one for me since I do own a Krups multifunction pot. To check that out I filled the pot with and checked the temperature on the slow-cooking setting–the temperature held at 185 ºF which looks as if it might work for some veggies and, perhaps, for tough cuts of meat. Switching to the keep-warm function and doing a temperature check two hours after I had switched to keep-warm function–but the water started at 185 ºF and I had absolutely no information on what the rate of cooling in the closed multifunction pot was. So–more data, please! I started with water at 110 ºF on keep-warm setting to see what happened. What happened was 165ºF.

So the multifunction pot (Krups) is out for just using the warm function, but I’ve discovered that if the pot is hot and then turned off, it hold a steady temperature for about two hours. Since I’m only doing sous vide for one and quick things, I don’t need a huge pot. This is going to take a bit more tending, but it would certainly be easier for quick things than a beer cooler (my laziness is showing, I know).

Searching for the best temperature to use for monkfish sous-vide produced an interesting array of suggestion. Always preferring data, I was glad to see Monkfish sous vide temperature experiment which tested throughout the range of temperatures that I found and gave a description of the fish texture at each.

From ChefSteps I also found the following temperature guide for fish and from Amazing Food Made easy temperatures and times in the range of 10 to 30 minutes:

  • Tender  40ºC/104ºF
  • Tender and flaky 50ºC/122ºF
  • Well done 60ºC/140ºF

For my monkfish, I think tender and flaky is a good option; for tuna, I might go for just tender–or even rare, depending on the grade. Now for time specifically for monkfish to be medium the general consensus seemed to be “medium” at 140ºF for 10 to 30 minutes. Since my tap water is at 140ºF with the beer cooler I should be good to go–though it seems strange to not have to be concerned about time but since it won’t go above the water temperature anything in that range should work.

For seasoning? Well, simple seemed good for my first try so I went with salt, freshly ground black pepper, and butter. I used the rice-cooking mode to bring the water up to 140ºF, put the monkfish in, closed the lid and crossed my fingers. It just seems too simple even though I’ve cooked other things by putting them in liquid and then turning off the heat and letting the residual do the cooking.

The results? The best monkfish I’ve ever eaten. Okay, so I’ve not had anyone else’s monkfish cooked sous vide, but it’s the best monkfish I’ve ever cooked. I cooked it at 140ºF for 30 minutes. Temperature check at the end of the cooking was still at 140ºF. The fish was tender and just starting to flake. I’m still trying to find some adjectives for it. If i have to pick one I think it will be just plain luscious!

Now that I’ve done all the temperature experiments on the Krups multifunction cooker (in slow-cooking mode and keep-warm mode), and on how it holds temperature, I see more sous vide in my future.

Related links:

Black bean pasta

I’ve had a long work week, which  ended  in frustration  this evening in–I’m hungry, but the planned meals just don’t DO it. After staring in the fridge for a while, and going back to take a few of those silly online quizzes, I still hadn’t the foggiest idea what I wanted to eat. More peering into cabinets (sardines–nope, tuna–NOT).

While skulking through the pantry, I realized that what I’d most likely cook were I not trying to be really serious about weight loss would be pasta.  Obviously, that won’t do–at least not pasta, as we most commonly think of it.

On my grocery rounds day before yesterday, I noticed that there was a new section of pasta displayed with lots of signage designed to attract attention–it was gluten-free pasta. I’m not gluten intolerant so I usually don’t pay attention to that (and I get really irritated when I see fruits and vegetables touted as gluten free–but I won’t go there now). As I stood perusing the boxes, I had a faint memory of a friend telling me that her grandchildren liked black bean pasta, so I read the ingredients list–and it was only black beans. I found that rather amazing, since so many gluten free products have potato starch or other things that are off limits to me right now. I succumbed–I bought a package of black bean pasta.

I stashed the black bean pasta (pasta?) in the pantry and went straight to  the Merriam-Webster unabridged dictionary to look up pasta. I discovered that it was defined as “an alimentary paste in processed form”. While spaghetti was given in an example nothing was specified as to what the paste was made of.  Ok–it’s black bean pasta.

I spend a little time thinking about why I eat pasta. It’s because I like pasta. I like the different shapes, too. I like the flavor of pasta made from wheat, but there is a texture factor there as well. Maybe there is more than that–maybe there is something about twirling spaghetti or angel hair pasta around a fork to get it into my mouth–part of the process of eating that’s satisfying–more than just the flavor.

What I’d usually make is spaghetti aglio e olio–sorry, that just sounds better that plain olive oil and garlic–so I decided to give the black bean pasta a trial that way. I got out my favorite pasta-cooking gadget. For this to keep with the meal plan in some remote fashion, I needed to add some vegetables. Spinach!  I sautéd the and spinach in the olive oil and dumped it over my black bean pasta. (I know I had a bigger serving of carbohydrate than I should have, even though it was black bean pasta, but at least I had veggies with it.)

The result? A pleasant surprise! It was remarkably satisfying (maybe just because I was hungry); the texture was good though not quite like pasta made from wheat flour. It’s not overwhelmingly “beany” either. It was so satisfying that I had to think that there is more to my liking pasta than just the flavor. Would I rather have had “real” pasta? Yes, but this was good. Black bean pasta is not going to replace the traditional stuff made of durham wheat flour. It certainly beat trying to fake it with spaghetti squash (though I like that too, but it’s definitely NOT pasta–it’s a vegetable so don’t tell me to use it instead of spaghetti).

The final call? I’ll cook  pasta made from black beans again until I can have the traditional kind that we usually think about. I don’t know why I had this resistance to this as pasta since I like soba and rice noodles. It’s a good stand in for this meal plan. After eating that I find that there is also pasta made of chickpeas (garbanzo beans).  I’m sure I’ll find some other uses for it as well, and I’ll explore other “alimentary pastes” to add to the soba and cellophane noodles as well. But I’ll still want that plate of “real” spaghetti aglio e olio!

Õ¿Õ


Pot roast made for one

beef shankEven though we are getting warmer weather now, there are still some grey, chilly (but not really cold) days here–the kind of day where you want to smell fresh-baked bread or something warm and filling cooking in the kitchen. Even though pot roast is something that reheats well, and freezes well when you make it, I don’t always want a huge batch so I was thinking about alternatives to the usual chuck roast.

Today it’s somewhere between ersatz osso buco and pot roast. I love pot roast, but starting with a huge (for single-serving cooking, at least) chuck roast is just a bit much when you don’t want to stock the freezer for future meals.

I decided that a cut of beef shank would make a great alternative to the chuck roast; just have it cut a bit thicker, and the marrow bone is another benefit.  Since I had this cow shank, I obviously thought of osso buco, though it’s true that  real thing is would be made with veal shanks. Veal shanks (and lamb shanks) are actually too pricey for my budget most of the time–I watch closely for managers’ specials in the butcher case.

browned beef shank I treated the beef shank just as I would a big chuck roast–I dredged it in flour and browned it in a mix of butter and olive oil.  (Smells luscious while it’s browning . The flavor and smell of butter–yum.)  While that was in progress, I got my veggies ready (meaning I got frozen carrots and onions out of the freezer),

(Note that this is in a pan of the appropriate size–not too big, not too small. There’s no plastic so this can go into the oven for a nice low and slow cooking, covered with its tight-fitting lid.

Once the shank was nicely browned, there not really much to do except tuck some carrots, onions, and bay leaves around IMG_8056the edges, a pinch of salt,  add some dry white wine, and some beef stock–just poured it in until it was about 1/3 of the way up the side of the meat. That’s the reason it’s important to have an appropriate size pot–too large and you have to add too much liquid.  We’re not wanting to make soup here.

Cover with a tight-fitting lid; use foil if necessary  to make sure of a tight seal.  Cook in  a low to medium oven (275 to 300 °F) for about 2 hours or until the meat pierces easily with a fork, and enjoy–without having  too much left over! (A dollop of gremolata would be good with this.)