A good home-cooked steak

Steak is not something that I order when I splurge for a meal in a fine restaurant; it’s too easy to do at home and good for single-serving cooking since it’s portioned when it comes home, and it’s easy to cook.

A good thick-cut, home-cooked steak is one of the things that I don’t mind having left over, since it’s usable as “roast beef” for a yummy sandwich.  (No, the roast beef from the deli simply does not do it.) My favorite way to cook the steak is from Cook’s Illustrated, 01 May 2007–it does take a little time and minimal effort, but it’s well worth it.

steaks in butcher caseMy usual choice of steak is a strip, or New York strip, cut 1-1/2 to 1-3/4 inches thick, with fat cap intact.  If I don’t find one lolling about   in the butcher case (you won’t likely find this in the pre-packaged section)  ask to have it cut the way you want it; my local Harris Teeter will cut to order but generally has thick-cut steaks in the butcher case.

This works fine with rib eye or with filet mignon, as long as it is thick-cut. Personally, I prefer strip or rib-eye to filet. Even with rib eye, it’s still not a substitute for real prime rib roast, but a good “second” so that I plan to have “leftovers”.

Ingredients

  • 1 boneless steak (1 1/2 to 1 3/4 inches thick (about 1 pound), strip or rib eye
  • Kosher salt and fresh ground black pepper
  • 1 tablespoon vegetable oil for searing

Preparation

  1. Adjust oven rack to  mid-position and pre-heat oven to 275 °F .
  2. Pat steaks dry with paper towel and season liberally with salt and freshly ground black pepper.
  3. Place steak on wire rack set in rimmed pan and place in oven.  (Steak does need to be raised rather in contact with pan).
  4. Cook until instant-read thermometer inserted in center of steak registers 90 to 95°F for rare to medium-rare, 20 to 25 minutes  (or 100 to 105°F  for medium, 25 to 30 minutes).
  5. Heat oil in  heavy-bottomed skillet over high heat until smoking.
  6. Place steak in the skillet and sear until well-browned and nicely crusty–about 1-1/2 to 2 minutes, lifting once halfway through to redistribute fat under the steak.
  7. Using tongs, turn steak and cook until well browned on the other side, about 2 to 2-1/2 minutes.
  8. Use tongs to stand steak on the sides and sear on all sides. (This really is worth the effort–and it really does not take long.
  9. Transfer to cooling rack, tent with foil, and let rest for about 10 minutes–this also is really worth the wait.
  10. You can prepare a quick pan sauce while the steak is resting, or simply add a pat of herb butter, horseradish,  or some blue cheese crumbles to the warm steak.

Add some simple sides like salad or baked potato. Now pour yourself a another glass of that luscious  red wine that was  breathing while you were cooking, and enjoy.

A son goût!

Pork butt steaks

One of the frustrations of cooking just for me is that some of the cuts of meat that I like best are typically way too big!  For example, one of my favorites is pork butt (also known as Boston butt).  Note that this does not refer to the location of the cut on the hog–but to the way it was processed and cut in pre-revolutionary and revolutionary times in New England–it’s shoulder that was salted and packed in barrels (called butts).  History aside, it’s good eating no matter what you call it. Enough fat to be succulent, and great for BBQ–friends are always willing to help eat it, but that takes a long time to cook and it’s a LOT of meat, so I generally turn to other cuts.

I use  chops (both loin and shoulder) often. I mean, chops are wonderful–quick, tasty, good size for one, but they are not the only good part of the hog!  I’d rather have cuts other than the ubiquitous loin chops with so little fat that they can be dry if not cooked carefully–such as, a pork neck steak is great (even if hard to find).

Country Spare Ribs

country-style spare ribs

Most often I use country-style spare ribs (from the rib end of the loin), since these can be had in quantities suitable for one person–single-serving plus one for the freezer.  These work well for braised pork and cabbage, and in chilli con carne.

pork butt steak

pork butt steak

While skulking through the supermarket just the other day is was quite surprised to find a package of pork butt steaks lying there in the meat case. No hesitation on my part, they went right into my basket, and home with me, especially since they were on “manager’s special”, but not a problem since I was planning to cook them right away: maybe griddle one, and pop the others into the Romertopf after salting and seasoning with a little chilli powder and coriander.  No water needed to roast these in the Romertopf–but good broth when they come out.   I had one hot meal when they came out of the oven,  packed two more servings with broth for the freezer, and had some for the hot and sour soup.

Some good eating with very little effort on my part–and all very inexpensively!

Roast pheasant for dinner

Two Whole Pheasants- Pheasant MeatOn a recent troll of the after-holiday, year-end goodies at my local Harris Teeter, which includes the free-standing freezer in the meat department (as well as the carts at the front of the store), I found pheasants on sale so I decided we (neighbors and friends) needed to have pheasant–especially since at least one had not tasted pheasant.

This is a first for me–I’ve never cooked farm-raised pheasant before; I’ve always cooked the wild birds that we got by hunting. Those we always braised since they could be old and tough.  I went to the McFarlane website Pheasant for Dinner to see what information I could find. I guess these are not likely to be either old  or tough, so I thought about roasting–then I decided that cooked in my Romertopf might be best since pheasants–even farm raised don’t have a lot of fat on them.  I decided that brown basmati rice would cook at the same time under the cut up birds; kind of self-seasoning with the pheasant juices–and whatever else I decided on.

Pheasant dinnerSince this was my first crack at farm-raised birds, I decided to seek expert consultation–from Mike Thomas in the meat department at Harris Teeter, thinking it likely that he’d be able to tell me more about the birds and how they would cook.  He agreed that the Romertopf should be a good way–so that decision was made.

As for seasoning, I was still debating. I wanted tangerines, but couldn’t find them. Tangelos? Well, maybe.  The meat of the tangelos was not very tasty, so I  got Mandarin oranges as well, but use only the tangelos as the mandarin oranges were too sweet.

I originally planned to do fingerling potatoes in the Romertopf with the birds, but I couldn’t get my head around orange and potato together, so I changed to brown basmati rice instead since it could also cook right with the birds in the Romertopf.

My next decision was whole or cut up. I finally decided that cut up would be best–so that I could use the carcasses to make some stock for cooking the rice. So get out the knives! I found a good demonstration on cutting up a pheasant at the McFarlane website–as I thought it’s like disjointing a chicken.  Since it’s not something I do all that often when doing single-serving cooking, it did take a bit, but I got them cut up.  I left bones in–even in the breasts since I think there is a lot of flavor in meat on the bone.

Pheasant dinner-2

into the oven

The backs, wings, necks, and other miscellaneous pieces, with carrot, onion, and bay leaves went into the stockpot (after browning). Simmered and skimmed I had a good start on the rice.

I minced two medium onions, four large cloves of garlic, and sautéed these with the rice before adding it to the soaked Romertopf with the rinsed basmati rice (two cups) with stock.  I added the zest of two tangelos to the rice. I pulled the meat from the stock bones and the giblets, chopped them finely, and added those to the rice–kind of a “dirty” rice here. That plus the 4 cups of stock went into the soaked Romertopf with the pheasant pieces on top, and into a cold oven, as usual with the Romertopf.

For a sauce, I modeled it after the one used for duck with fresh figs; I reduced the remaining pheasant stock and the juice of one tangelo slowly to about 1-1/2 cups–it’s not intended to be thick–more “au jus”. It needed a bit of sweetness despite the tangelo juice. After tasting both thyme honey and leatherwood honey, I opted for the leatherwood, since there was thyme with the bird and the leatherwood added a “dark” contrast to the tangelo and the meatiness of the stock.

(It looked great when I opened the Romertopf, but I was too intent on eating to stop and take pictures.)

My friends brought some awesome roasted Brussels sprouts (with bacon and garlic) to accompany the pheasant–a good meal, with good company!

<>^<>

I used the ratio suggested for the brown basmati rice, but it was just a bit soupy. Next time I’ll use 1 part rice to 1.5 water. Otherwise I was pretty happy with the results–we certainly made a dent it the rice and the pheasant.

The farm-raised pheasants are more chicken-like than wild-pheasant-like–a little disappointing if you are used to the wild ones. I’d cook them again–if I find them on sale, but I’d really rather have the wild ones, though I certainly wouldn’t have been roasting them.

Not knowing the flavor of the farm-raised birds made choosing a wine a bit difficult. We drank a 2012 Ravenswood “Besieged” with it, and it worked well. This limited release is a blend containing 35% Carignane, 20% Petite Sirah, 18% Zinfandel, 13% Mourvedre, 9% Alicante Bouschet, and 5% Barbera. (This was a wine that I stumbled upon while doing my shopping one Saturday at the local Harris Teeter. I’m a definite Alicante Bouschet fan and this blend was very mellow, and fruity so I did something that I don’t do often–I bought a half case of it–and I think I’m going to wish I had more of it.

It’s turkey time–again!

At the risk of being considered heretical, perhaps even un-American, and definitely not in the proper holiday spirit, I’m going to come right out and say that turkey would be my last choice for the main course of a holiday feast.  I’d much rather have duck, goose, roast pork, prime rib, or even roast chicken, (unless we’re going to talk wild turkey).  The problem is that it’s an achievement to get a whole turkey to be edible (and I do have a friend who does that well, so I eat her turkey–it’s the best I’ve had when the bird is roasted whole). The problem is the turkey–not the cook!

It seems to me that turkey is all about presentation, and NOT about cooking it to the best advantage. We’ve bred turkeys to have a huge chunk of breast meat, which really isn’t that flavorful. That white meat is attached to the legs, dark meat.  Now dark and white meat cook very differently, and here they are attached to the same bird, so that you have to cook them together–a real cooking dilemma.

Not to mislead you, some of the same problems exist with chicken, or Cornish game hen/poussin, though it’s easier to find ways to have both come out reasonably well on the smaller bird. The white meat still is not as flavorful as the dark, even on free-range chickens. I do use the breast meat–I usually cook it separately from the dark meat, but do sometimes roast a whole bird (French style in a dutch oven, in the Romertopf, or sometimes just uncovered in the oven). 

It’s not that I don’t like turkey–at least occasionally–even the white meat.  I just want it like I want all my food–to have the best taste and texture possible. It’s always seemed to me that when you have two things as different as turkey legs and breast, that you should not try to cook them together–neither will be at its best.  Cook’s Illustrated has provided a recipe for optimizing turkey, and it involves taking it apart, but it also provides for stuffing, and presentation, too. I’d like to try this out with a whole turkey to see how complicated it is to get it done.

I’ll buy turkey breast fillets almost any time for a quick sauté–just like I’d do chicken breasts, but I still like dark meat best. I’m actually glad to see turkeys in the market–especially the pieces–light and dark meat separately. While you can almost always get turkey breast and sometimes even the drumsticks, what I really like are the thighs–without the drumsticks attached. I was happy to find turkey thighs at Harris Teeter when I went to do my marketing yesterday.

roasted turkey thigh in roasting pan

turkey my way

Yes, even though turkey-eating season is about to get into full swing, I came  home with a package of turkey thighs–and tonight I had roast turkey–thigh that is.

It’s ideal for cooking for one–and inexpensive as well. One roasted turkey thigh will give me several meals: hot roast turkey, a cold turkey sandwich, and a serving of turkey soup.

-<>^<>-

Since I was working on an indexing job today, I really did not get fancy with my turkey thighs. I just let the thighs sit for a couple hours in the refrigerator, uncovered, so the skin would dry.  I plopped them into the roasting pan with some wedges of potatoes, and salted the skin liberally so it would be crisp and golden brown. Then, into the oven (350°F) for about an hour, and out came my roast turkey.

roast turkey thigh partially carved

ready to serve

I let it rest just like a whole bird, and then carved off my supper. Since I was after as few dishes to wash as possible, I made a cabbage dish that I wanted to try, and had potatoes roasted right along with the turkey–no gravy or stuffing tonight. (Cook’s Illustrated did give instructions for making stuffing with the disassembled bird, and I do want to try to adapt that for my single-serving quantity–but just not today. It was an easy, inexpensive, and tasty meal.

I’d eat more turkey if I were able to get thighs year round.  I’m looking forward to more roast turkey in the next few days as I have another thigh that’s been roasted.  I suspect there will be more than one turkey sandwich, and some will end up in with the bones in some hearty turkey, barley or lentil, and mushroom soup from my tiny single-serving size slow-cooker.

plate of turkey

Cooking monkfish

TGIEOT—yes, that’s a bit more than TGIF!  It’s end-of-term.  The Spring term was the school term from hell, starting right at the end of Fall term!  Over the winter break I had unexpected course preparation to do for two online classes—switching from Blackboard to Sakai—for content management.  Top that off with an ongoing indexing project, and it’s—well, let’s just say it left very little time for cleaning, cooking, or writing!  Then, add to that a hard-drive failure for my computer….but it’s over now.

I’ve taken some time to work on revising the on-deck herb garden since I had plants that needed to go into their home pots, and a couple of days to do nothing but have quality time with the cat.  All that has left me yearning for some relaxation time and some really good food—cooked by me.

My day was absolutely made when I got my email delivery of the “Fresh Catch” specials from my local Harris Teeter this morning: they had monkfish! In terms of favorite fish, that’s right up there with Chilean sea bass for me.  Needless to say, I scarfed down my morning coffee and headed right off to HT.

fennel, leeks and garlic ready to roast

fennel, leeks and garlic

Supper this evening was roasted monkfish, with roasted fennel with leeks, garlic, and a dash of red pepper flakes, with a nice un-oaked chardonnay.  The fennel was an in-store, spur of the moment thing since it looked so gorgeous.

Even though it is warm this afternoon, I opted to cook in the oven because I wanted roasted fennel as well. I’ve done monkfish in hobo-pack style before but I thought I’d try roasting it this time and see if I couldn’t have a one-pot dinner.

monkfish

monkfish

I’d seen a post by Edward Schneider in Mark Bittman’s NY Times column (Diner’s Journal) about roasting monkfish, and the differences in monkfish on both sides of the Atlantic. After reading that I salted my monkfish for about an hour, and then roasted it.  I did manage to make a one-pan meal out of it. Since I had to allow about 40 minutes for the fennel to roast, I started that first.  After about 15 minutes, I laid the monkfish on top of the leeks, pushing the fennel wedges to the side, and popped it back into the oven for about 15 minutes.  I used very simple seasoning on the fish—olive oil and salt before going into the oven, and nothing for than fresh-ground black pepper and a pat of unsalted butter after it came out of the oven. So very simple—so very good, and even healthy.

(The only thing I wish I had done differently would have been to add some sweet red (or orange or yellow) bell pepper with the fennel. A glass of un-oaked chardonnay complemented the meal very nicely.)

IMG_7553

Cucumber mango salad

Photograph of 7 mangoes in case with PLU stickers

mangoes

Yesterday I had a minor food crisis–fruit overload.  I went to Costco (for cat food and laundry detergent) but while walking past the huge stacks of produce I smelled first peaches, and then pears–and then there were the mangoes. The difficult decision was pears or peaches, and/or mangoes.  The pears won over peaches though the peaches smelled as good as the pears, but the price was such that I brought both mangoes and pears home with me. Both were much more reasonably priced than in the supermarket. So it was a no-brainer–I eat all the pears and mangoes that I want and share some with friends and I’m still ahead on the cost. (The pears were absolutely luscious–every bit as good as they actually smelled!)

bartlett pears in case (from costco)

Bartlett pears

That quantity of fruit does have you looking for some things to do other than just eat it out-of-hand.  I had some mangoes that needed to be used; I had eaten lots and shared some, but I needed to eat some more! (Not that eating big, juicy, ripe mangoes is really any hardship.) Saved by inspiration that struck when I started smelling my supper cooking.

I was roasting some pork (on which I’d used a dry adobo seasoning rub given to me by a friend as a birthday present)–just a single big meaty spare rib for supper. This was one that was extra from making the chili con carne--simply would not fit in the pot so it became a small pork roast for one with just a tad left over.

I couldn’t think what to have with it until I smelled the roasting pork with the spicy adobo seasoning, something said “sweet and cool”–I thought of mangoes and cucumbers (which were sitting right there in the refrigerator just waiting to be used).

Not being particularly inspired about what to do with these two things, I headed for my laptop and Google!  As I was entering the “cucumber and ma….” the instant search which I’ve enabled popped up “cucumber and mango salad”.  That sounded just right with spicy roast pork.

I perused a number of recipe sites and blogs and found several interesting ones for cucumber and mango salads (and somehow I thought I was being very original when I visualized that combination):

  • from Daily Bites blog mango and cucumber, lime, ginger, honey (or coconut nectar–something new to explore), and optional cilantro.
  • from Eating Well which added avocado, brown sugar, rice vinegar, canola oil, and fish sauce as well as red pepper flakes.
  • from Herbivoracious  using Thai sweet chili sauce, rice vinegar, mint and cilantro leaves, and toasted sesame seeds.
  • from My Recipes  the simplest of all–cucumber, mango, lime juice and ground red pepper.
  • from Rookie Cookie with the addition of jacima, red bell pepper, honey, rice vinegar, and chile powder.
  • from The Full Plate Blog those basics but with champagne vinegar in the dressing, and suggestions for optional pea shoots (yum!), and slivered almonds, with romaine lettuce.

Those certainly gave a place to start for concocting for what I needed that night’s supper.  Then I found recipes with suggestions for adding grilled shrimp…seems like these need to be explored  much more carefully next time I’m that flush with mangoes.

rosy-cheeked bartlet pear and mango on blue/purple print towel.

pear and mango

Since my adobo rub had given me quite a spicy seasoning for the pork, I decided that I did not want to add chile powder, or even ginger–anything at all spicy to the salad–I wanted something cool and contrasting with the spicy meat.

I opted for the bare basics: cucumbers (the little baby ones), mango, shallot (no red onion in the house),  and since I didn’t have fresh mint (I’ve now killed my second plant), I used frozen cilantro (from Dorot) in the dressing which was just a simple vinaigrette made with olive oil and sherry vinegar (drat–no lime or champagne vinegar) and I didn’t think that rice wine vinegar would stand up to the adobo seasoning of the pork).

Even one mango and cucumber gave me some extra, so I dressed only what I was going to eat right then.  (What was left became another salad, with very thinly sliced pork right in with the fruit, and I added some of those luscious Bartlett pears to it as well–threw that over some mixed greens and it made an awesome lunch. I dressed with a fig-infused white balsamic vinaigrette since I added the pear.

The combination of mango, or other sweet fruit, and cucumber is definitely one that I’ll be playing with in the future–probably with chicken, shrimp  or maybe even crab, or scallops to “bulk it up” a bit for a complete meal.

(I know, it’s not a beautiful plate, but I was too hungry to go outside in the dark to find garnish–I almost didn’t even take a picture.)

A son goût!

pork, cucumber-mango salad

supper

Red, white, and blue roasted potatoes

Happy Fourth of July to all!

mixed color potatoes in colander

I really was planning to do something special today–more smoked lamb and goat shanks–but I admit to turning to a total wuss, wimping out…as I looked at the weather forecast for the week.  Even though those are easy, it still requires some minding of the grill, and I just could not face it.  I resolved to have a quiet, cool Fourth of July–just me and the cat–indoors with the air conditioning…and I woke up this morning wishing I’d not been such a wuss.

Saved by friends!  An impromptu invitation to join them for grilled chicken this evening.  So–I’m having my quiet Fourth, but with friends and neighbors.

close-up of cut purple, pink/red, and yellow potatoes

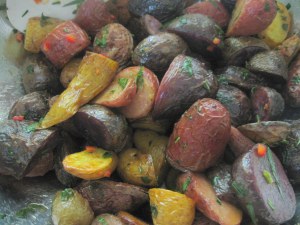
Not to go empty-handed, I am making some patriotic roasted potatoes–red, white, and blue–Red Thumb, Russian Banana (okay, bit of fudging here), and Purple Majesty potatoes (new ones from the farm).  Since it’s HOT (my thermometer is reading 98°F now), I’ve decided that those roasted potatoes are going to turn into something that can be eaten at “room temperature”, that will be light and refreshing, and compliment the chicken.

I’m taking  newly dug tri-colored potatoes and scrubbing their delicate skins carefully, cutting as needed to have them equal sizes so that they cook at the same rate, tossing them with a little olive oil; then into a preheated pan and into a 350° F oven until they are tender.

cut and oiled potatoes on baking sheet

I’ve done what America’s Test Kitchen recommends and placed cut sides in contact with the baking sheet so that at least some of the potatoes will brown to give roasted flavor. Now for some complimentary and contrasting flavors to finish these. Since all these do taste a bit different, and for me one of the fun things about this is to be able to taste the individual potatoes and to compare them–think about comparing wines–I want light seasoning–nothing to overwhelm the potatoes themselves. The only seasoning at this point is kosher salt.

Since it’s hot outside (my thermometer is now reading 99.7°F ), I’m thinking light and cool flavors.  I don’t want “potato salad”–so vinegar is out, but I do need something “bright”–and light, and something cool.  Time to check out the herbs on the deck, and the crisper drawer.

lemon, tarragon, chives, mint, and chili peppers.

Chicken makes me think tarragon.  Cool makes me thing mint–hmm.  Let me smush a couple of leaves together and see how that smells.  Tarragon–warm, mint–cool.  Need some brightness to set off the earthiness of the potatoes–lemon zest, and maybe just a bit of lemon juice over the potatoes while they are still warm.  Seems a good start–but not quite there yet.  Needs a little “spice”–some very finely minced red chili pepper might just do it.

After the potatoes had been in the oven for 30 minutes, I used the tip of a paring knife to check doneness–not quite; and, not quite brown enough.  (I probably should have used the heavier half-pan baking sheet instead of this one–drat.) I kicked the oven temperature to 450°F for another 15 minutes and checked again.  Perfect!  Brown potatoes–so out of the oven, ready for the first seasoning.

roasted potatoes--browned edges of the red, yellow and purple  ones.While still hot, I tossed them with the zest of one lemon and most of the juice of the lemon–nice bright flavor to contrast with the brown and earthy potatoes.  After cooling a bit, I tossed in about a tablespoon each pretty finely chopped French tarragon and mint. That got the first taste of cool mint, followed by the warm flavor of French tarragon.  So far so good.

I let them stand for a bit and tasted again–the lemon flavor is there but not overwhelming–the juice has added just a bit of tartness, but not enough to taste like a “potato salad”. Now, I’m debating chives and chili pepper.  I taste the chili pepper–it’s not screaming hot–and I think that just an occasional bit of heat as you eat the potatoes would be nice.  I seeded and removed the ribs, and finely minced about 1/5 of the pepper and tossed that with the potatoes. (Still debating about the chives–I really don’t want them to taste like ersatz baked potatoes.)

seasoned IMG_6935After standing for a bit longer, I tasted again, and decided that chives are not what is needed here–I probably should just leave them alone!

So the final seasonings are the zest of one lemon, lemon juice, mint, tarragon, and just a touch of  red Serrano chili pepper, and a very light sprinkle of a good fruity, extra-virgin olive oil.  I hope that after standing a bit more (not to be refrigerated before we eat the at ambient temperature–or maybe a little less–thermometer now at 100.6°F ) there will be flavors of warm and cool herbs, the brightness of lemon (juice and zest), and an occasional burst of heat from the chili pepper.

Using the baking sheet so that the potatoes are spread out and don’t steam, and preheated does really help get browned roasted potatoes.  If they are too crowded, they will only “steam” and not brown–not really roasted.  The browning is, after all, the whole purpose of turning on the oven!

It’s not smoked lamb shanks, but it’s going to be a pleasant evening with friends–and I do think that something similar will return to go with those lamb shanks when they happen later–when the temperature does not turn me into a total wimp!

…and yes, I’ve done that final taste–yum!  No chives though.

roasted potatoes, with herbs and chili peppers in serving dish.

Leftovers? Possibly–it is a big dish of potatoes for three, but leftovers here are desirable.  Tomorrow they can become a roasted potato salad–perhaps with just a splash of balsamic vinegar, adding some fresh tomato, and cucumber, and, perhaps, some celery, radishes, crisp sweet onion or some freshly snipped chives.

Happy Fourth of July!  A son goût!  
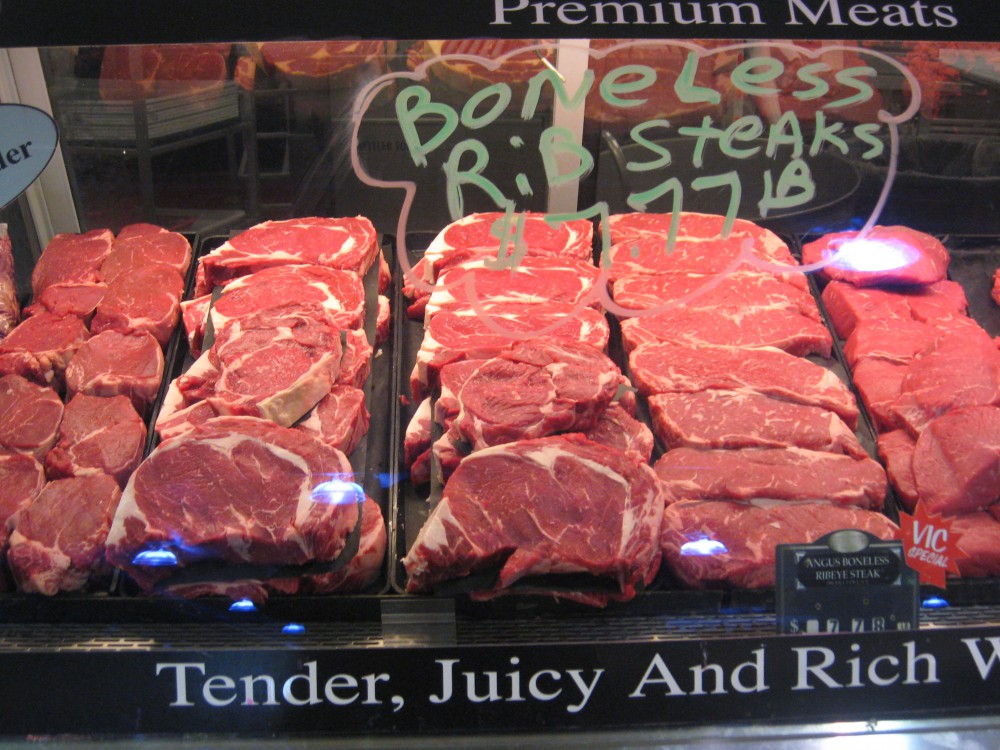
Under-appreciated veggies: Brussels sprouts

bagged Brussels sprouts at Harris Teeter supermarket

Brussels sprouts

Obviously I’m writing this because I have Brussels sprouts in hand now!  They are a favorite winter veggie in my kitchen but I think they are sometimes under-appreciated and under-used by those of us doing single-serving cooking, possibly because the come in packages that contain too many.  Some of these may be underused because we’ve had them prepared in ways that did not really let them make their best impression.  I thought I’d address some of these, especially the cool weather crops–starting with one that seems to be a love-it-or-hate-it vegetable: Brussels sprouts.  Until I started cooking for myself, I was in the hate-it camp.  Most of the Brussels sprouts that I had were over-cooked, mushy, and bitter; in a word, nasty!

Fortunately, I’ve discovered ways to make Brussels sprouts a desirable vegetable because they have some excellent qualities: they are  inexpensive and readily available in the wintertime.  They are nutritious–I’ll not give you all the details here, but you can find all that sort of information from the Nutrient Database Laboratory.  They are versatile–you can use them as a substitute for cabbage in some recipes, and (a concern if you’re cooking for one), they store well in the fridge.

First, storage:  Brussels sprouts often come prepackaged in a mesh bag that’s about a pound or so.  That’s a lot of Brussels sprouts if you’re cooking for one and had to use them all at one time.  Fortunately that’s not the case–they’re small, separate units so you are not trying to preserve a cut vegetable (always more difficult)–big bonus for those cooking for one.  I store mine with a paper towel that has been dampened and then squeezed mostly dry, in a partly open zipper-lock bag in the vegetable drawer.   I’ve seen suggestions (The Victory Garden Cookbook–see bibliography) that the flavor gets stronger with storage.  I’ve not found that to be a problem, but that may be because I do keep my fridge really cold, and the damp paper towel helps even out moisture. However, if you do find that you don’t like the taste after they’ve been stored for a few days, the other option of something to do with the rest of the bag would be to blanch and freeze part of them.  Blanching is simple:  bring a large pot of water to a boil, salt it heavily (after it’s come to a boil), and put in the Brussels sprouts for about 2 minutes; then “shock” in an ice bath, drain, and freeze.  (The purpose of the blanching is to stop enzyme action, and it keeps the color bright and green.)

Now for cooking them. Personally I’m not a fan of boiling veggies as a method of cooking them (other than blanching before freezing)–there are so many nutrients that are water soluble!  So my preference is for some cooking method that does not involve putting them into huge quantities of water to cook completely.  So that leaves steaming, stir-frying, roasting, and  microwaving.  The best way to avoid having “nasty” sprouts is NOT to overcook them.

I’ve added them to soups, used them instead of cabbage with braised pork, and added them to one-dish meals like roasted potatoes with sausages, and lots of other things.  They lend themselves well to improvisation and substitution.

Recipes for steaming, blanching, roasting and microwaving can be found in a number of cookbooks so I’ll not post here, except for the recipe that I just made to go along with my baked sweet potato.

For more information on how to cook and specific recipes, I suggest you might want to check The Victory Garden Cookbook by Marian Morash (see bibliography).  As I was sitting here at the computer writing this, my e-mail notification popped up and said it had received a notification of a new post from domestic diva M.D., a blog that I think is worth following for anyone who cooks.  I was surprised to see that the subject was  roasted Brussels sprouts.  

Since it was about lunch time, I was preheating the oven to bake a sweet potato (a very large sweet potato so that I’ll have some for another use as well).  I read the recipe and grabbed the last of the Brussels sprouts from the fridge.  I didn’t have the full amount, but this is a recipe that does not depend on the quantity–which is great for us solo cooks.  Since I was baking my potato in a 350 ° F oven, I did alter the cooking time just a bit–I popped the Brussels sprouts prepared as in the recipe into the oven for about 45 minutes right along side my sweet plate with half  a baked sweet potato and roasted Brussels sproutspotato, and there was my colorful, nutritious lunch!  This is the kind of improvisation that can make cooking for one easy–many recipes aren’t dependent on how many you have or how many you want to cook and eat right now.

You should check out this recipe.  I’d not used garlic powder with them before, but it was yummy and much easier to use than minced garlic.  One of the comments on this post suggested adding Parmesan cheese–I did not try that because I’m out of Parmigano-Reggiano (horrors!), but it sounds  like something that would taste great!

Braise-roasted sausages, potatoes, and Brussels sprouts

Another dreary, rainy, winter day…not particularly cold, but as usual on a day like this I’m in need of comfort food.  In trying to keep one of my New Year’s resolutions to be sure and use what’s in my freezer, I was rummaging through the freezer to see what was there.  Interesting package of four plump sausages.  Only problem, I don’t know what they are–except that they are labeled “hot”.   But I’m sure they are due to be used–probably a sample that I got at one of the farmers’ markets this summer.  So we’re going to cook those this evening.  (I usually try to be careful to label things that get put into the freezer–I suspect that these were frozen when I brought them home, so I just tossed them into the freezer and…now I don’t know for sure what I’ve got.  But–they look like the should turn into a luscious meal once cooked.

Looking through the vegetable drawer in the fridge I found Brussels sprouts, potatoes (yes, I do keep my potatoes in the fridge because they aren’t in there long enough to change taste or texture.)

Onions, garlic, chili peppers, potatoes, sausages…and sprouts.  I’m being lazy today so I want easy food, but flavorful and satisfying.  Since there are four sausages I think that I should just do about 4 serving of this dish: one for another day this week, and maybe one for the “ready-to-eat” part of the freezer, along with the soup and the chilli.

I took four medium size Yukon Gold potatoes scrubbed but not peeled, cut into 1-1/2-inch chunks, mixed with about 6 or 8 garlic cloves, one medium onion chopped into 1-inch chunks, about 15 trimmed Brussels sprouts, all sprinkled with a three-finger pinch of salt.  On top of that go the four sausages, skins pierced so that they won’t explode, and some herbs. (Being in truly lazy mode, I used herbs de Provence since that’s got a variety of herbs so likely something will connect with the sausage seasoning.

I added about 1/4 cup of water, covered the baking dish tightly, and popped it into a 350 ° F oven.  I’ll check it in about 45 minutes.  When the potatoes are close to being done,  the cover comes off and  it finish cooking uncovered.  Add one green salad, or maybe just the sprouts, and there’s comfort food, and lazy comfort food at that!