Roast pheasant for dinner

Two Whole Pheasants- Pheasant MeatOn a recent troll of the after-holiday, year-end goodies at my local Harris Teeter, which includes the free-standing freezer in the meat department (as well as the carts at the front of the store), I found pheasants on sale so I decided we (neighbors and friends) needed to have pheasant–especially since at least one had not tasted pheasant.

This is a first for me–I’ve never cooked farm-raised pheasant before; I’ve always cooked the wild birds that we got by hunting. Those we always braised since they could be old and tough.  I went to the McFarlane website Pheasant for Dinner to see what information I could find. I guess these are not likely to be either old  or tough, so I thought about roasting–then I decided that cooked in my Romertopf might be best since pheasants–even farm raised don’t have a lot of fat on them.  I decided that brown basmati rice would cook at the same time under the cut up birds; kind of self-seasoning with the pheasant juices–and whatever else I decided on.

Pheasant dinnerSince this was my first crack at farm-raised birds, I decided to seek expert consultation–from Mike Thomas in the meat department at Harris Teeter, thinking it likely that he’d be able to tell me more about the birds and how they would cook.  He agreed that the Romertopf should be a good way–so that decision was made.

As for seasoning, I was still debating. I wanted tangerines, but couldn’t find them. Tangelos? Well, maybe.  The meat of the tangelos was not very tasty, so I  got Mandarin oranges as well, but use only the tangelos as the mandarin oranges were too sweet.

I originally planned to do fingerling potatoes in the Romertopf with the birds, but I couldn’t get my head around orange and potato together, so I changed to brown basmati rice instead since it could also cook right with the birds in the Romertopf.

My next decision was whole or cut up. I finally decided that cut up would be best–so that I could use the carcasses to make some stock for cooking the rice. So get out the knives! I found a good demonstration on cutting up a pheasant at the McFarlane website–as I thought it’s like disjointing a chicken.  Since it’s not something I do all that often when doing single-serving cooking, it did take a bit, but I got them cut up.  I left bones in–even in the breasts since I think there is a lot of flavor in meat on the bone.
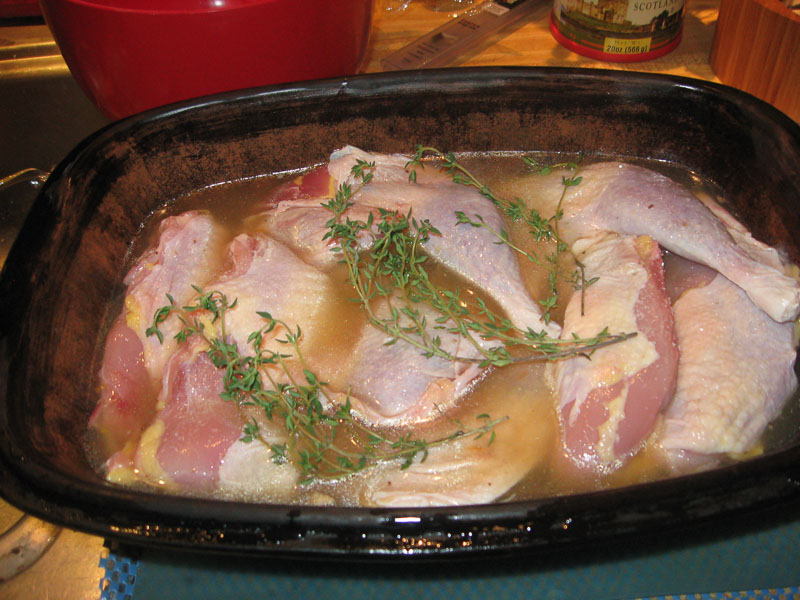
Pheasant dinner-2

into the oven

The backs, wings, necks, and other miscellaneous pieces, with carrot, onion, and bay leaves went into the stockpot (after browning). Simmered and skimmed I had a good start on the rice.

I minced two medium onions, four large cloves of garlic, and sautéed these with the rice before adding it to the soaked Romertopf with the rinsed basmati rice (two cups) with stock.  I added the zest of two tangelos to the rice. I pulled the meat from the stock bones and the giblets, chopped them finely, and added those to the rice–kind of a “dirty” rice here. That plus the 4 cups of stock went into the soaked Romertopf with the pheasant pieces on top, and into a cold oven, as usual with the Romertopf.

For a sauce, I modeled it after the one used for duck with fresh figs; I reduced the remaining pheasant stock and the juice of one tangelo slowly to about 1-1/2 cups–it’s not intended to be thick–more “au jus”. It needed a bit of sweetness despite the tangelo juice. After tasting both thyme honey and leatherwood honey, I opted for the leatherwood, since there was thyme with the bird and the leatherwood added a “dark” contrast to the tangelo and the meatiness of the stock.

(It looked great when I opened the Romertopf, but I was too intent on eating to stop and take pictures.)

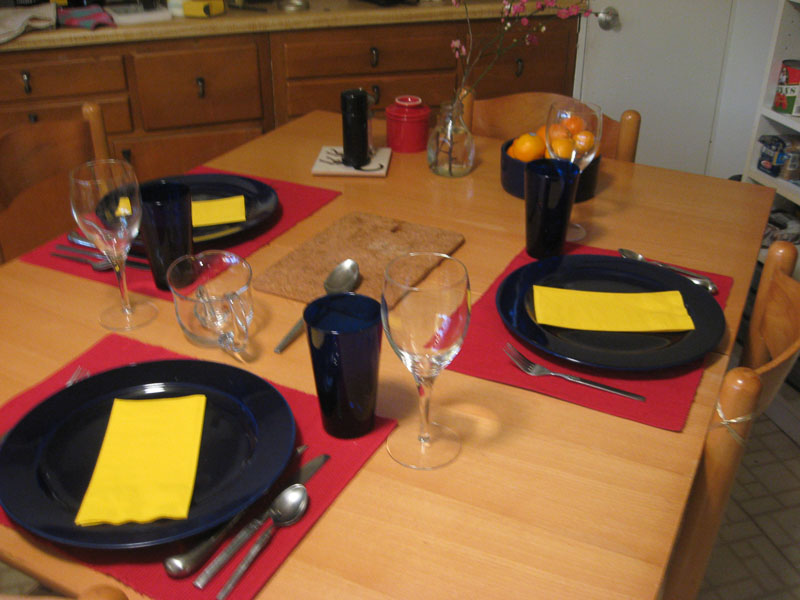
My friends brought some awesome roasted Brussels sprouts (with bacon and garlic) to accompany the pheasant–a good meal, with good company!

<>^<>

I used the ratio suggested for the brown basmati rice, but it was just a bit soupy. Next time I’ll use 1 part rice to 1.5 water. Otherwise I was pretty happy with the results–we certainly made a dent it the rice and the pheasant.

The farm-raised pheasants are more chicken-like than wild-pheasant-like–a little disappointing if you are used to the wild ones. I’d cook them again–if I find them on sale, but I’d really rather have the wild ones, though I certainly wouldn’t have been roasting them.

Not knowing the flavor of the farm-raised birds made choosing a wine a bit difficult. We drank a 2012 Ravenswood “Besieged” with it, and it worked well. This limited release is a blend containing 35% Carignane, 20% Petite Sirah, 18% Zinfandel, 13% Mourvedre, 9% Alicante Bouschet, and 5% Barbera. (This was a wine that I stumbled upon while doing my shopping one Saturday at the local Harris Teeter. I’m a definite Alicante Bouschet fan and this blend was very mellow, and fruity so I did something that I don’t do often–I bought a half case of it–and I think I’m going to wish I had more of it.

Now there is chicken soup….

Since I cooked a whole chicken for Christmas dinner (chicken-in-a-pot), I have cold chicken for sandwiches and salad, and I’m getting another two meals from that same bird from what meat left on the carcass.

Rather than spend lots of time picking bits of meat off the carcass when I needed to be indexing, I popped it into a very low oven (I guess I could have used the rice-cooker/slow-cooker) overnight, since I don’t mind having the oven on in chilly weather to help warm the place up; it reduces other heating.  This morning, what meat was left simply fell off the bones.

The chicken-in-a-pot made some serious broth, some of which went with Christmas  chicken au jus. There were onions and garlic in the pot with the chicken that the recipe called for discarding after straining the broth.  They actually tasted good so I put them back in with the carcass.  I added lentils and barley to that broth, both of which cook in about 30 minutes, some aleppo pepper and a few red chilli flakes, seasoned to taste with sea salt, for a very hearty chicken soup for supper–all with very little effort on my part. (And there another serving of that which is going in the freezer for another chilly day.)

Though this was a pricey chicken, I can’t complain–the flavor was worth it, and I’ve had enough additional meals that tasted so good to make it not such an extravagance as it seemed at first.

…and now it’s turkey soup!

Remember those turkey thighs that I roasted a couple days ago? They have really been a bargain.  I spent about $5 on the package of thighs–two small-to-medium ones.

I had my roast turkey with sides of potatoes and cabbage (with juniper berries). Then I had two full-size sandwiches, and a half sandwich for lunches. Now I’m finishing the turkey thighs with a very hearty bowl of soup (and a  glass of good wine).

small Rival Crockette

a crockette

I popped those thigh bones (with what meat wasn’t easy to carve for sandwiches) in to my tiny little single-serving crock-pot to make some stock–I just added a little salt, a bay leaf, the brown stuff that I deglazed from the roasting pan, and enough water to cover the bones. After slow cooking overnight, I removed the thigh bones.  The meat just fell off into the pot.

In the same little crock-pot (don’t want extra dishes to wash), I added a small handful of barley, some dried mushrooms of various sorts–including shiitake, chanterelle, and porcini. The other things that went into this soup were the leftover cabbage (with juniper berries) and a few potatoes that were roasted with the turkey.  (You may be thinking that this is pretty heavy on starch, but to finish the soup, I added some green stuff.)

small leaves of greens

mixed greens

About half an hour before I was ready to eat, I went out to the garden (which I share through the good graces of a neighbor) and picked a good size handful of small kale, turnip, and mustard greens.

After washing, I cut these in bite size pieces (though that was almost unnecessary as they were really not as big as my hand). They went into the crock-pot; in about 20 minutes they were still bright green but tender.

I did a final adjustment of salt using French Grey sea salt, and finally added several drops of black truffle oil to finish the soup.

-<>^<>-

I’ve had my bowl of soup for supper this evening–and it looks as if I’ll get one more meal out of those turkey thighs–with the barley, and the amount of meat that was left on the bones, there is easily another serving of this soup for lunch or supper tomorrow. (I’m sure that by the time I reheat it, those greens won’t be quite so bright green, but the flavors may have melded with the other ingredients so it should be good–maybe even better than this evening.

bowl of soup with greens

a warm, hearty supper

-<>^<>-

I opened a bottle of wine this evening that was a completely unknown to me. It was a limited release called “Dark” from Apothic. I was completely beguiled by the description that said that it “blends dark fruit flavors of blueberry and blackberry with opulent notes of coffee and dark chocolate”.  How could I possibly pass that up? (I found it while shopping at Harris Teeter–just after I had bought a case of something called “Besieged”–more about that one later.)

I was surprised how dark it was when I poured it into the glass! (I even tried to take a picture–but it just looks almost black–so forget that.) It is definitely a “big” wine and right out of the bottle it was fruity and mellow–but after breathing for a bit it lives up to its description.

I thought it might overwhelm my bowl of turkey soup, but with the juniper berries, the rather emphatic mushrooms, the flavors of the greens, and the truffle oil, it turned out to be a great combination.  Fortunately there is some of the wine left for tomorrow’s soup! This is one time when I’m looking forward to the “leftovers”.

It’s turkey time–again!

At the risk of being considered heretical, perhaps even un-American, and definitely not in the proper holiday spirit, I’m going to come right out and say that turkey would be my last choice for the main course of a holiday feast.  I’d much rather have duck, goose, roast pork, prime rib, or even roast chicken, (unless we’re going to talk wild turkey).  The problem is that it’s an achievement to get a whole turkey to be edible (and I do have a friend who does that well, so I eat her turkey–it’s the best I’ve had when the bird is roasted whole). The problem is the turkey–not the cook!

It seems to me that turkey is all about presentation, and NOT about cooking it to the best advantage. We’ve bred turkeys to have a huge chunk of breast meat, which really isn’t that flavorful. That white meat is attached to the legs, dark meat.  Now dark and white meat cook very differently, and here they are attached to the same bird, so that you have to cook them together–a real cooking dilemma.

Not to mislead you, some of the same problems exist with chicken, or Cornish game hen/poussin, though it’s easier to find ways to have both come out reasonably well on the smaller bird. The white meat still is not as flavorful as the dark, even on free-range chickens. I do use the breast meat–I usually cook it separately from the dark meat, but do sometimes roast a whole bird (French style in a dutch oven, in the Romertopf, or sometimes just uncovered in the oven). 

It’s not that I don’t like turkey–at least occasionally–even the white meat.  I just want it like I want all my food–to have the best taste and texture possible. It’s always seemed to me that when you have two things as different as turkey legs and breast, that you should not try to cook them together–neither will be at its best.  Cook’s Illustrated has provided a recipe for optimizing turkey, and it involves taking it apart, but it also provides for stuffing, and presentation, too. I’d like to try this out with a whole turkey to see how complicated it is to get it done.

I’ll buy turkey breast fillets almost any time for a quick sauté–just like I’d do chicken breasts, but I still like dark meat best. I’m actually glad to see turkeys in the market–especially the pieces–light and dark meat separately. While you can almost always get turkey breast and sometimes even the drumsticks, what I really like are the thighs–without the drumsticks attached. I was happy to find turkey thighs at Harris Teeter when I went to do my marketing yesterday.

roasted turkey thigh in roasting pan

turkey my way

Yes, even though turkey-eating season is about to get into full swing, I came  home with a package of turkey thighs–and tonight I had roast turkey–thigh that is.

It’s ideal for cooking for one–and inexpensive as well. One roasted turkey thigh will give me several meals: hot roast turkey, a cold turkey sandwich, and a serving of turkey soup.

-<>^<>-

Since I was working on an indexing job today, I really did not get fancy with my turkey thighs. I just let the thighs sit for a couple hours in the refrigerator, uncovered, so the skin would dry.  I plopped them into the roasting pan with some wedges of potatoes, and salted the skin liberally so it would be crisp and golden brown. Then, into the oven (350°F) for about an hour, and out came my roast turkey.

roast turkey thigh partially carved

ready to serve

I let it rest just like a whole bird, and then carved off my supper. Since I was after as few dishes to wash as possible, I made a cabbage dish that I wanted to try, and had potatoes roasted right along with the turkey–no gravy or stuffing tonight. (Cook’s Illustrated did give instructions for making stuffing with the disassembled bird, and I do want to try to adapt that for my single-serving quantity–but just not today. It was an easy, inexpensive, and tasty meal.

I’d eat more turkey if I were able to get thighs year round.  I’m looking forward to more roast turkey in the next few days as I have another thigh that’s been roasted.  I suspect there will be more than one turkey sandwich, and some will end up in with the bones in some hearty turkey, barley or lentil, and mushroom soup from my tiny single-serving size slow-cooker.

plate of turkey

Check out this recipe….

We’re into hot, humid weather now so I’m always looking for hearty, meal-type salads.  I just found this one which has gone into my must-try category.  From The Honor System:  Chipotle Chicken Salad.

Spicy Peach Chicken Wings Two Ways!

Image

What’s the best way to say this? I. LOVE. TO. GRILL! Now that you know this little secret about me, let me share one of my favorite sauces that I like to make while cooking. First I want to acknowledge that a lot of people are intimidated when it comes to dealing with MEAT and FIRE. This type of cooking has been going on way before Man realized that wearing white after Labor Day was unacceptable. Besides eating sushi or raw fruits/veggies I can’t imagine a more natural way to enjoy food. Regardless of your belief of how and when we got here once Man found fire he also found his love for a Medium T-Bone steak. I’m just saying.

In this article I’m going to share with you TWO different ways to prepare chicken wings. One will be for you go-getters out there who love to put meat on fire, and the other will be for the less adventurous group who likes to play it safe.

If you are ready to receive your fire badge in scouting then you will take the road I love to travel by and go fire up that grill! Even with grilling you still have options on how you actually want to achieve AWESOMENESS. You can use “Propane, and Propane accessories”-Hank Hill or you can use Charcoal. I personally prefer using gas since you can control the heat and when you’re done, you’re done! With charcoal you will have to move up to the advance cooking class since this will require a lot more concentration and skill set to master this form of cooking. Charcoal will definitely give you that authentic home cooked flavor, however it will also give your wings 5th degree burns really quickly if you don’t pay attention!

Ok so enough about that. Let’s cook!

Propane: Cut your grill up to medium-high heat to get the grates nice and hot for the initial sear when you lay the wing down. After placing the wings on the grill for a couple of minutes, lower the heat and flip those bad boys over. At this point there should be a little color as well as grill marks on outside so that you can keep up with when to turn your wings. Keep rotating so that each sides gets crispy brown skin. Don’t wait to long to add the sauce, the last 10-15 minutes of cooking should give you enough time to let the flavors marinate all the way through.

Charcoal:  After you have your nice and red hot you will have to work a lot harder than your gas friend up there because now it’s all about the Indirect Heat method. Ten out of 10 times your grill is going to be extremely hot in the center where you have nonchalantly piled all the charcoal and set it on fire with half a can of lighter fluid. Once you have brought the level 3 fire down to burning red coals you will need to place the wings on the outer perimeter so that you can control how quickly your wings will cook. 

There is no way I’m going to say it will take approximately (fill in the blank) minutes and your wings will be perfect. I can’t sell myself out like that. But I can tell you that the food will let you know when it’s done. Chicken wings start of pale, soft and flabby-just like a newborn baby! Then in the toddler years they will make a lot of noise by hissing and spitting juices everywhere (terrible two’s phase). This is when you have to constantly watch them and move them around to make sure they don’t burn up. Once they become teenagers they have more color to them, stay to themselves and become firmer. They think that they are grown however on the inside they still haven’t developed yet. (I’m 15 and I know everything and my parents are lame phase) And then we come to the adult phase. Now it’s time to sauce em’ up. They have graduated college and ready for the real world. CONGRATULATIONS! You raised your wings right. They have earned the privilege to become a part of the meal.

Now for those of you who choose to bake/broil the wings instead of grilling not only do I give you a serious side eye but I will give you what you need to attempt to duplicate that outdoor flavor without actually going OUTDOORS!!

After seasoning your wings with the dry ingredients (salt, pepper, paprika and garlic powder) your oven should already be on and ready for action at 400 degrees. You are going to lay the wings out in the pan and leave them uncovered. The point is to get that skin crispy as if it had been lying out in the sun all Summer. That crunch is what you are looking for, we want savory crispy wings not soggy chicken pieces. So after 50 minutes (half a Lifetime movie) you want to check and see if those wings have plumped up
and start turning brown like this.

Alrighty then, your wings are ready to be sauced up! At this point you want to add all that finger licking goodness to the chicken so that they can be joined for eternity in flavor heaven. I actually would add the sauce probably around the 40 min mark just so that it gets in there all the way to the bone! Once you have the wings sauced and crispy now it’s time to crank up the heat and cut the broiler on. This will allow the wings to get more color and tighten up the skin just as if you had grilled them. Now is the time to pay attention to what’s going on in the oven instead of pouring that next glass of wine. Things can go from happy-go-lucky cooking time to OH GOD WHERE’S THE FIRE EXTINGUISHER?! Please check on your wings every 5 minutes until they are at the level that you prefer. The sugar in the peach preserves will heat up and become sticky, this will also cause the wings to “burn” more on the outside so unless you want wings that look like tar I suggest you watch them carefully.

This is what I have come up with after cooking in the oven and plating.

So below you will find the recipe for the Spicy Peach Sauce that I have talked about this whole time. The great part about this is the fact that almost any sauce can be substituted based on whatever flavor your palate is looking for at the time. I love complex sauces that make you think about what you are actually tasting. If you are going to eat something good, you might as well do it right!

Ingredients

  • 2 tablespoons table salt
  • 1  teaspoon black pepper
  • 1 teaspoon smoked paprika
  • ½ teaspoon garlic powder
  • ½ stick butter
  • 2 ounces of minced garlic
  • ½ cup peach preserves
  • ¼ cup hot sauce
  • 1 tablespoon soy sauce
  • Sesame seeds (optional)

Preparation & cooking

  • Prepare wing mixture in advance to let them marinate.  Mix salt, black pepper, paprika and garlic powder in a small bowl.
  • Add chicken wings and toss to coat.
  • Grill the wings.
  • Melt the butter in medium saucepan with the garlic.
  • Stir in the peach preserves, hot sauce, and soy sauce. Cook until syrupy and thick (stir so it doesn’t clump) about  5 minutes.
  • Transfer sauce to a large bowl.
  • Add the wings to the sauce and toss.

Enjoy!!!!

A one-dish meal.

A lot of us eventually reach the point when we realize we are getting a bit rotund (or worse) and start thinking about watching (or losing) weight, or maybe just being more conscious about nutrition.  With several of those things in mind (or should I really say on my mind) I did some web browsing.

I found a website that I’d like to share with you:  A Slice of Nutrition.  I found this through another blog that I follow, My Imperfect Kitchen, that had a post by Avital Greenbaum as a guest blogger–Chicken, Zucchini, and Quinoa. 

One dish meals are very appealing to me–at least some of the time, because I can be lazy, have a good meal and not have to wash lots of pots and pans.  (No, Frankie refuses to do that!)  I’ve had quinoa in breakfast cereals, and things like that but after reading how healthy it is, I decided I need to try it in a main dish and this looked like a great place to start.

Garlic scapes lying next to a basket of strawberries

garlic scapes

I do have to admit that, as well as being constitutionally unable to make a small pot of soup, I seem to be unable to leave a recipe alone when I’m making it.  I did almost follow this one.  Instead of garlic powder, I had fresh, green garlic scapes from the farmers’ market.  Those went it, and I added some mushrooms; otherwise, I left it alone.  This one-dish meal is now in the oven (despite the heat) getting ready for my supper.

Since my veggies are included with the dish, I think that all I’ll need to add is some of those luscious ripe strawberries as dessert!


Baking dish with chicken and quinoa

Chicken, zucchini & quinoa

This is a keeper–only a few minutes prep, and it’s unattended cooking with tasty results. The quinoa is very light–good in hot weather.  I think that it might make some very tasty “salads” with lentils for satisfying summer meals when the weather is sweltering and I want a light meal.

French chicken in a pot

I’ve been wanting to try this method of cooking a chicken for a long time, but just haven’t wanted to pay the price of a free-range chicken this big.  While marketing the other day I found on marked down so I thought it was finally time to try this out.

The basic recipe is from Cook’s Illustrated (Published January 1, 2008. )  Since this was the first time that I’ve cooked a chicken by this method, I wanted to follow the recipe rather closely before I try  changes, so all that I altered was the herbs and vegetables:  I used shallots instead of onions and garlic, and  sage instead of the rosemary).  The chicken is browned and in the oven now.

♥♦♥

Later, after the chicken is out of the pot…It’s definitely a keeper recipe.  I’m amazed at how well the seasonings penetrated the bird.  With it sealed up in the pot you don’t get to smell it as you would open roasting, but when you open the pot, it’s a real blast of wonderful smells.

We had this with roasted potatoes and haricots verts, and baked figs for dessert…a simple, but delicious meal.  We had this with Paul Lehrner cuvée Claus 2007 which is 85% Zweifelt and 15% Blaufränkisch.  Wonderful!

Next step is to try this with a game hen or petit poussin to adapt this for single-serving cooking.

Budget shopping

Mostly I don’t like shopping–unless it’s food related shopping.  So most of the time, I like going to the grocery store (even if it’s just the supermarket). I make lists for things like dish detergent, or paper towels, and the like, but I don’t make lists for my food except in a very general way.  I want to shop for what looks good, is priced right, or maybe even something unusual.  In short I do meal-planning on the hoof.

Yesterday was one of those shopping days–I came out feeling like I had gotten some bargains and that doesn’t happen often.  I went to get milk specifically, but my general list was for meals for the weekend and into the first of next week.  Since I have had a bit of a splurge on eating out recently (OnlyBurger two days in a row) it’s time to eat in.

When I’m shopping where I’m comfortable about the quality of the meats and produce and the handling of perishables , I’ll sometimes find some real bargains.  Yesterday was one of those days.

I found tuna medallions at a great price which means that I’m going to be making some tuna confit to have for lunches or light suppers since that will keep in the refrigerator for two or three weeks (if it lasts that long).

My next “find” was a rib-eye steak that had a healthy mark-down tag on it–its sell by date was yesterday evening, but it looked good so that came home with me for supper last night.  (It was really tasty.)

My other glorious find was a plump 4-1/2 or 5 pound, free range chicken that had been marked down to half price since the sell-by date was today.  That means that as long as I’m planning to cook the chicken tomorrow and treat it appropriately in the intervening day (I keep my refrigerator really cold, about 34 or 36 ° F, constantly monitored with a thermometer), I’ve gotten a real bargain and something that I would not usually buy.

True, it’s a lot of chicken for one person and I may be looking to invite friends for a meal and still have more meals for me (and the cat) but I haven’t made roast chicken in a while.  Now I can have fun perusing the wine selection and thinking about how I’m going to cook that bird.  Weather permitting, it may go on the grill to be smoked, but I’ll see what tomorrow brings.

Growing & cooking with French tarragon

French tarragon

French tarragon (Artemisia dracunculus)

For me, another “must have” fresh herb is  French tarragon (Artemesia dracunculus var. sativa)–now.  Until I tasted the French variety fresh, I disliked it intensely.  I simply could not understand why people would rave about it as seasoning for anything.  Dried tarragon was what I tasted first–and threw it out: it was harsh and hay-like.

Then I decided to try the fresh herb–fresh is better, right?  I trundled off to a garden center and bought a “tarragon” plant.  Tarragon is tarragon, right?

That plant grew well, had nice tall, straight stems, but the taste did nothing for me; in fact I thought it was somewhat bitter.  I did realize that sometimes the flavor of herbs varies–just as anything live and growing varies from one to another.  So being somewhat stubborn, I went to a garden center with a larger selection of herbs and I bought another plant…this one labelled as French tarragon–the botanical name was shown on the tag.  (I almost didn’t buy it because while it was nice and green, it was rather straggly looking and it was expensive (compared to other herbs and the first tarragon plant I had bought).  But–I did buy it as it was the only tarragon  there; it grew slowly and was rather weedy looking–not a pretty plant.  When I was finally able to  pick some leaves to use,  that first taste made it obvious to me that this was something different.

I did some research and discovered that there are two kinds of tarragon:  Russian and French.  The Russian can be grown from seed, is a more robust looking plant, cheaper,  and is what you are likely to get if you buy a plant that just called tarragon.  On the other hand, the French tarragon will likely be more expensive, not as sturdy looking, must be started from cuttings or root divisions as it does not produce seeds; it’s also slower growing–but, the flavor is awesome!

The lessons from this?  Don’t bother to buy dried tarragon unless you like the flavor of hay, and don’t buy a tarragon plant unless it’s labelled French tarragon (Artemesia dracunculus var. sativa).

Once you get this treasure home, you’ll need to see that it has excellent drainage and lots of sun.  This particular herb has a few idiosyncrasies:   it likes a light, richer soil than other herbs such as  thyme, sage or oregano and while it is a hardy perennial, it actually needs (requires) a cold dormant period.  It will die back to the ground in the fall, but should survive the winter if it is in well-drained soil.

[Note:  If you live where you don’t get that kind of cold in the winter you may have trouble growing French tarragon as a perennial; instead of trying the Russian you might want to try Mexican tarragon (Tagetes lucida) also know as marigold mint.  The flavor of this is slightly sweeter and more licorice-like than French tarragon, but better than the Russian tarragon.]

It may be so slow to show in the spring that you’ll think that it’s not coming back–be patient.  In an extremely hot, humid climate, I’ve found that it does well with about six or eight hours of sunlight and then some shade during the hottest part of the day.  As it is rather slow growing, it may not need dividing for three or four years.

Now that you have this in your herb garden, what can you do with it?  To harvest it for use, you can cut almost anywhere, but don’t take more than half the plant at one time–it needs enough leaves left to have strength to grow back.  By pinching tips you can keep it a bit more bushy–but it’s always going to be a kind of weedy looking herb.

It’s best used as soon as it’s harvested, but it can be stored wrapped in a damp paper towel in a sealed zipperlock plastic bag in the refrigerator for three or four days, but one of the reasons for growing it is to use it at its peak flavor–right away.

The flavor of French tarragon is described as sweet and anise-like, with minty and peppery sensations–complex!  (It contains some of the same essential oil that is found in anise.)  It’s best to add it near the end of cooking because, like some other herbs (basil, for example), it loses some flavor with heating.

This is not an herb that you reach for as your basic “go to” like thyme or oregano but it’s a classic with chicken, mild seafood, and eggs.   A simple lemon/butter sauce is delightful on seafood with a bit of tarragon added.  The sweet, anise-like flavor is also good with root veggies like carrots, beets; fresh vegetables like peas, asparagus, green beans.   You can use tarragon with fruits as well as vegetables:  melon, peaches or stone fruits.  An intriguing suggestion  I’ve seen (but not yet tried) is with citrus sorbet such as grapefruit or lime; sounds like a great summer cooler–I also  wonder about adding it with grapefruit when making aqua fresca for hot weather drinks.

It’s part of some classic herb mixes such as the French mixture called fines herbs and herbes de Provence (actual herbs used and proportions will vary with the producer).  It’s also use in the classic Béarnaise sauce, frequently served with a good steak.

You’ll find your own uses for this herb if you have it readily available.  As always, smell and taste and see what clicks with you; even though there are classic combination, there are lots of other possibilities.

A son goût!